Use Point Emboss Line  to place points to emboss a line on an area of stitching.
Each line you place, as ended by a right-click, is treated separately by Undo.
Shortcuts
-
Needle Points, Emboss Tab:

-
Keys: Alt, E, E, FP
Place Points to Emboss a Line on a Petal
-
Click File, New

to open a new window.
-
In the Quick Access toolbar, click Insert

.
-
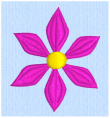
In the folder Documents\mySewnet\Samples\Stitch Editor\Stitch load the 'Flower Pink' embroidery.
-
Click the Emboss tab.
-
Zoom in on one of the petals.
-
In the Emboss Line

drop-down menu, click the Point Emboss Line

icon. The pointer changes to the Point pointer

.
-
Click to place your first point. The point appears automatically as a small hollow square.
-
Click to place a second point.
-
Continue placing points along the desired path.
-
Curved lines are created automatically. For corners and straight sections, hold down the Shift key.
-
To move one of the nodes, move the pointer over the node. The pointer changes to the Move Node pointer

.
-
Adjust the position of the node as desired.
-
Right-click to end the line and deselect the function. The emboss line will appear on the selected petal.
-
Repeat to place as many embossed lines as desired.
The second and subsequent points are round.
Click Delete to remove the last–placed point.