Use Remove Needle Points In Fill
to remove most of the needle points within an area of stitches, leaving the area blank so that the stamp you apply will show clearly. Only visible stitches are affected.
If underlay stitches are not hidden, they will also have their stitch points removed. If desired, use the Draw Range slider bars to hide underlay stitches so they are not affected.
Use this function to prepare areas with existing patterns for stamps or embossed lines.
|
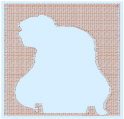
1. Original pattern in 2D |
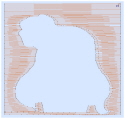
2. Needle points removed in 2D |
Not all stitch points are removed. If you find it necessary to have all stitch points removed from inside an area then use Delete

. Select a block within the bounds of an area using one of the Select functions. Ensure you do not select any part of the edge of the area or the shape of the area will be lost or distorted. For instance, if you have a rectangle then use Box Select to make a block that is just inside the stitches along the edges of your rectangle. Delete the stitch points with Delete and you will be left with the shape of the area with stitches going across it, but no stitch points inside the area.
Shortcuts
-
Needle Points, Emboss Tab:

-
Keys: Alt, E, RN
Remove the Stitch Points from an Embroidery Background
-
Click File, New

to open a new window.
-
In the Quick Access toolbar, click Insert

.
-
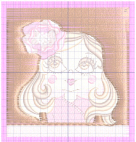
In the folder Documents\mySewnet\Samples\Stitch Editor\Stitch load the 'Girl with Rose' embroidery.
-
In the Control Strip, click Draw Next Color Block

once so that the background color behind the girl’s head is shown.
-
Click Ghost Mode

. The stitches that were hidden are now shown in pale colors.
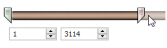
-
Move the Draw To End handle at the right of the slider bar to approximately stitch number 3114. This hides the background areas between the girl’s head and hair, and below her portrait.
To adjust stitch by stitch, use the arrows in the stitch number boxes. -
Click the Emboss tab.
-
Click Remove Needle Points in Fill

. The stitches making the flat fill pattern will be removed.
It is recommended to use Remove Needle Points in Fill before stamping an area of stitches. This is so that the new pattern or series of stamps is clearly visible, rather than adding to an existing fill pattern.