Use Global Morphing ![]() to move all the visible stitches to change the shape and size of the embroidery. Choose any of the following global effects:
to move all the visible stitches to change the shape and size of the embroidery. Choose any of the following global effects:
|
Pinch the stitches together in the center, while pulling the outer stitches away from each other |
|
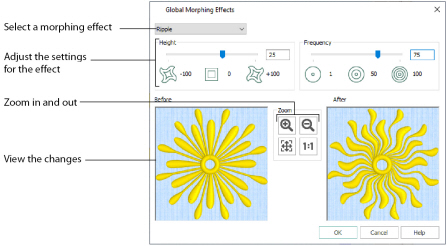
Apply a wave pattern radiating from the center, like dropping a stone into a pond. |
|
Slant the stitches horizontally to the left or right. |
|
Slant the stitches vertically up or down. |
|
Stretch the stitches around an imaginary sphere. |
|
Twist the stitches around the center, creating a swirling effect like a whirlpool |
|
Move the stitches to follow a horizontal wave pattern. |
|
Move the stitches to follow a vertical wave pattern |
Depending on the Morphing effect selected, move one or two slider bars, or type in a number, to adjust the intensity or height and frequency for the effect. The Before and After boxes show the original stitches and a preview of the effect.
All visible stitches are morphed by the chosen effect. Global Morphing may not be used when a block of stitches is selected.
Global Morphing effects are generally more pleasing when applied to an embroidery that is mainly or completely symmetrical.
The last effect used and the last settings for each effect are remembered for the current mySewnet™ Stitch Editor session.
This function works on the entire visible area. Hide colors and use Draw Range to isolate an area of the embroidery if you do not wish to affect the whole embroidery.
Shortcuts
-
Morphing, Modify Tab:

-
Keys: Alt, M, G
Use the Zoom Controls to zoom in and out, zoom to fit and show the Before and After views at Real Size. The preview changes in real time when you adjust the settings.

Use Zoom In
to enlarge the view of an area of the Before and After views.
Click Zoom In
and move the pointer over the Before or After view. The mouse pointer changes to the zoom in pointer

. Then either click a point on the view you want to zoom in towards, or click and drag a rectangle around the area you want to zoom in to and release the mouse button to zoom.
When zoomed in, use the scroll bars to move around the Before and After views.
Use Zoom Out

to zoom out of the Before and After views, to show more of the embroidery in each view.
Click Zoom Out

and move the pointer over the Before or After view. The mouse pointer changes to the zoom out pointer

. Then click a point on the Before or After view you want to zoom out from.
Click Zoom To Fit

to view all of the stitches in the Before and After views.
Click Real Size

to show the Before and After views at the Real Size selected in mySewnet™ Configure.