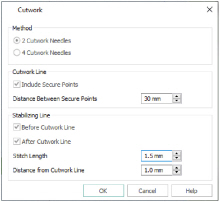
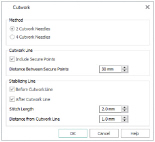
The cutwork needle features allow you to draw a cutting line within a design, optimized for the INSPIRA™ Cutwork Needles. Use two or four cutwork needles, add secure points for fabric stability, and add a stabilizing line.
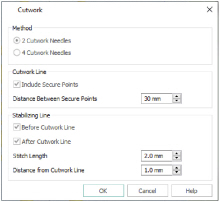
Method
Choose between:
Choose between 2 Cutwork Needles and 4 Cutwork Needles.
By default 2 needles is selected.
With 2 needles, a bladed needle set at one angle is used to cut around the shape, and then the second needle travels around the shape cutting at a different angle.
With 4 needles a more precise cutting method is used, where each needle is used for the section of the shape that closely matches its angle. This method is recommended for more delicate fabrics.
Include Secure Points
Select Include Secure Points to create gaps in the cutwork needle line. By default Include Secure Points is selected.
This allows the cut fabric to remain attached for stability while all the cutwork needle lines are created. Afterwards it can be easily trimmed with scissors.
Distance Between Secure Points
Set the Distance Between Secure Points from 10mm to 100mm in steps of 1mm. The initial setting is 30mm.
Insert a stabilizing line of stitching before and/or after the cutwork line. This may be helpful for reverse appliqué or free-standing lace, but is not required if you are simply cutting out a shape.
Before Cutwork Line
By default Before Cutwork Line is selected.
After Cutwork Line
By default After Cutwork Line is selected.
Stitch Length
Set the Stitch Length from 1.0 to 6.0mm in 0.1mm steps. The default setting is 2mm.
Distance from Cutwork Line
Set the distance of the stabilizing line from the cutwork line from 0.1 to 10.0mm in 0.1mm steps. The default setting is 1.0mm.
-
Click File, New

to open a new window.
-
In the Quick Access toolbar, click Change Hoop
 .
. -
In the Universal Hoop Group, set the Hoop Size to 100mm x 100mm - Universal Standard Hoop 1. Click OK.
-
In the Quick Access toolbar, click Insert

.
-
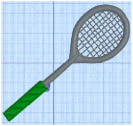
In the folder Documents\mySewnet\Samples\Stitch Editor\Stitch, open the embroidery Racket.vp4.
-
Look at the Color Select area of the Control Panel. There are two thread colors in the worksheet.
-
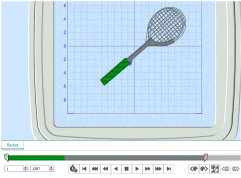
In the Control Strip, click Start
 , and then click Play
  to use the Stitch Player to play through the embroidery as if it was being stitched. The handle and shaft of the racket are stitched out before the strings and head.
 -
Click Draw All Stitches

.
-
Slowly move the slider for the End to the left. As you move the slider, some of the stitches forming the head of the racket and the strings are hidden.
The Draw Range enables you to insert stitches (or in this case a cutwork line) into a design. However, to work accurately you need to be able to see where the stitches after the cutwork line will be placed. -
Click Ghost Mode
 .
.
The stitches that were hidden are now white. -
Move the End slider to the left to where the stitches move into the strings for the racket, approximately stitch number 504.
If needed, click the arrows on the number boxes below the slider bar to show or hide stitches one at a time.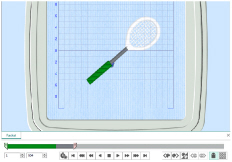
This is where the cutwork line will be inserted.
Stitch numbers are given as guides only. It is more important to ensure that the correct stitches are hidden or left showing than to follow the exact stitch numbers. -
Click the Modify tab.
-
In the Cutwork area, click the Options button. The Cutwork dialog box appears.
-
In Method, ensure that 2 Cutwork Needles is selected.
-
In Cutwork Line ensure that Include Secure Points is selected (checked), and that Distance Between Secure Points is set to 30mm.
Secure Points prevent the fabric from lifting up while it is being cut. The secure points are trimmed away, and the fabric removed, after the cutwork line has been completed, and before washable stabilizer (or reverse appliqué fabric) is placed. -
In Stabilizing Line ensure that both Before Cutwork Line and After Cutwork Line are selected (checked).
-
Ensure that Stitch Length is set to 1.5mm, and set Distance from Cutwork Line to 1.0mm.
The line cut through the fabric may have a sharper edge if a stabilizing line of stitching is placed before the cutwork line. This can prevent the fabric from shifting when the cutting needle moves in and out. -
Click OK to close the Cutwork dialog box.
-
Click the View tab, then click 2D View with Stitch Points

. The individual stitches are now visible.
-
Click Zoom to Rectangle

. The pointer changes to the zoom pointer
 .
. -
Click and drag to draw a rectangle around the racket head, then release the mouse button to zoom in.
-
Click the Modify tab.
-

menu, click Point Cutwork Line

. The pointer changes to the Point pointer

.
-
Click to place points around the inside edge of the racket head, a short distance from the edge of the satin stitch.
As you click the third point on the line, the line becomes closed (it becomes a loop). As you place more points the line adjusts itself.
The line may ’swing’ while you place points. Continue, and you can adjust it afterwards if required.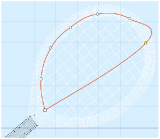
-
Place points until you are near to your starting point, then right-click to finish.
-
Look at the Control Panel. There are now five thread colors in the color worksheet.
-
Ensure that Ghost Mode
 is still selected.
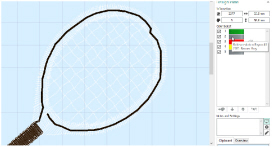
-
Move the End (right) slider on the Draw Range to the beginning of the racket head stitching, approximately stitch number 504.
This will enable you to distinguish between the thread colors more clearly. -
Hover the mouse pointer over the first gray thread in the Color Worksheet. The thread in the embroidery is highlighted, and a tooltip displays the name of the thread (Robison-Anton Rayon 40, 2585 Banner Gray).
As well as the gray stitching in the racket shaft, a ring of stitching around the head of the racket is highlighted. This is the first stabilizing line. -
Hover the mouse pointer over the colors below, in turn.
-
Click Save As
 and the Save As dialog box will appear.
-
In the Save As Type box, ensure .vp4 is selected. Browse to the folder Documents\mySewnet\MyDesigns. In the File Name box, change the name to 'RacketCutwork', then click Save.
The preferred file format for saving embroideries is .vp4, as this will preserve background and appliqué information, thread color information and notes.
When inserting washable stabilizer (or appliqué fabric), insert it after needle color 2 - red, and before the second stabilizing line. The stitch line will then hold the stabilizer or fabric in place.
When the racket embroidery has been stitched out, wash the fabric to remove the washable stabilizer that the racket strings were stitched on. -
Click Draw All Stitches

.
-
Click Ghost Mode
 so it is no longer selected.
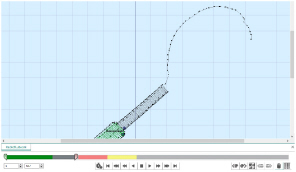
-
Move the slider on the Zoom Bar to zoom out until you can see the top of the green for the racket handle.
-
Move the End (right) slider on the Draw Range to the beginning of the racket shaft stitching, approximately stitch number 374.
-
Slowly move the End slider on the Draw Range to the right. The shaft of the racket is drawn.
-
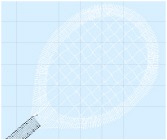
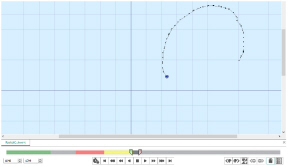
Move the slider further to the right. A circle is drawn. This is the stabilizing line stitched before the cutwork line is placed.
-
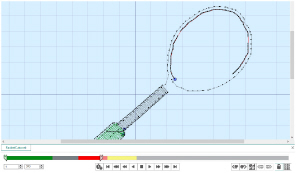
Move the slider again to the right. The first circular line is completed, and a second heavier circular line is placed within the first. This is the line for the first cutwork needle (the red in the color worksheet).
The closely spaced (0.3mm) needle points are shown as a heavy line. The secure points (gaps) are shown as a thin red line. -
Move the slider further still to the right. A second cutwork line (the yellow in the color worksheet) is placed directly on top of the first.
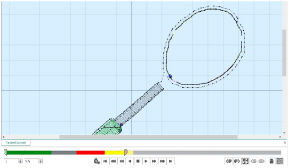
The best way to detect the added line is that the lines in the gaps for the secure points change from red to yellow.
You could also see the changes by deselecting (unchecking) the check box next to the red in the color worksheet after drawing the yellow (first) cutwork line. The red cut line will disappear. -
Move the slider to the right to the end of the yellow color in the Control Strip.
-
Drag the Start (left) slider to the right to the last of the yellow cutwork line stitches, so that it touches the other slider.
-
Now move the End (right) slider to the right again to draw the second stabilizing line.
-
Drag the Start (left) slider back to the start point to view all of the stitching and the cutwork lines.

-
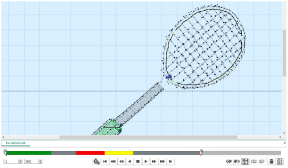
Move the End (right) slider to the right. The mesh for the racket strings is displayed.
-
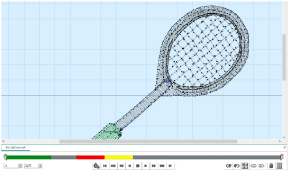
Finally, move the slider the rest of the way, and the satin for the racket head is placed over the stabilizing and cutwork lines.
This will enable a cutwork line to be placed before the strings and head.
With 2 needles, a bladed needle set at one angle is used to cut around the shape, and then the second needle travels around the shape cutting at a different angle.
4 Cutwork Needles is a little more precise, and is recommended for delicate fabrics, but takes longer to complete the cutwork process. In this design the cutwork line will be covered by a satin border, therefore it is not necessary to use four needles.
A stabilizing line placed after the cutwork line may also add security. Stabilizing lines may not always be suitable when embroidering on delicate fabrics, or if you are simply cutting out a shape.
The points for the cutwork needle lines and the stabilizing lines are inserted automatically.
The stitch points for the cutwork lines are very close together (0.3mm).
The gaps in this line represent the secure points.
Surrounding this cutwork lines are the more widely spaced points for the two stabilizing lines. (As the points for the two cutwork lines and the two stabilizing lines are placed on top of each other, you cannot see the separate lines.)
The gray for the racket shaft and head is now in two parts, with the bright red and yellow for the Inspira Cutwork needles in between.
The bright red is the cutwork line for Inspira Cutwork Needle 1, and the bright yellow is for Inspira Cutwork Needle 2. The satin of the racket head uses Banner Gray.
View the Stitching Order in Detail
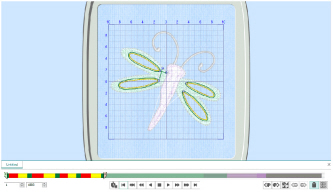
Use a Cutwork Line for Dragonfly Wings
-
Click File, New

to open a new window.
-
In the Quick Access toolbar, click Insert

.
-
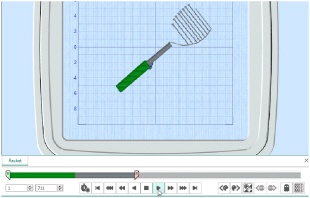
In the folder Documents\mySewnet\Samples\Stitch Editor\Stitch, open the Perky Dragonfly embroidery to load it.
-
On the Home tab, use Box Select

to select the dragonfly, then click Resize

. The handles on the selection box become blue.
-

and in the dialog box change the Height and Width to 125%, then click Apply and Close. See Resize a Dragonfly Embroidery for full instructions, if desired.
-
Left-click outside the select box to deselect the stitches.
-
In the Stitch Player section of the Control Strip, click Start

. The Draw from End handle moves to the far left, and none of the embroidery can be seen.
-
Click Ghost Mode

. A pale version of the embroidery can now be seen.
-
Click Play

to play through the embroidery as if it was being stitched. The wings of the dragonfly are stitched out before the body.
-
Click Stop

when the body is all or partially shown.
-
In the Control Strip, click Start

again.
-
Click the Modify tab.
-
In the Cutwork area, click the Options button. The Cutwork dialog box appears.
-
In Cutwork Line ensure that Include Secure Points is selected (checked), and that Distance Between Secure Points is set to 30mm.
Secure Points prevent the fabric from lifting up while it is being cut. -
In Stabilizing Line, ensure that Before Cutwork Line is selected.
-
Deselect (uncheck) After Cutwork Line.
In this design there will be several cutwork areas, and the color blocks for the cutwork lines will be merged. Frequent needle changing would be necessary if there was a stabilizing line after each cutwork line. -
Ensure that Stitch Length is set to 2mm, and set Distance from Cutwork Line to 1.0mm.
-
Click OK to close the Cutwork dialog box.
-
Click Zoom To Rectangle

. Click and drag to draw a rectangle around the top left wing, then release the mouse button to zoom in.
-
In the Cutwork Line

menu, click Point Cutwork Line

. The pointer changes to the Point pointer

.
-
Starting at the base of the ’hole’ in the top left wing, click to place a series of points just inside the edge of the satin stitch line.
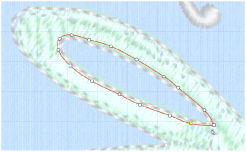
As you click the third point on the line, the line becomes closed (it becomes a loop). As you place more points the line adjusts itself.
The line may ’swing’ while you place points. Continue, and you can adjust it afterwards if required. -
Click points to complete the line around the edge of the hole.
-
Move the pointer over one of the nodes on the line. The pointer changes to the Move Node pointer

. Adjust the node as desired.
-
Right-click to place the cutwork line and deselect Point Cutwork Line. The cutwork line is placed on the work area.
-
In the Design Panel, click the Overview tab.
-
Click and drag in the overview window to position the lower left wing in the center of the screen.
-
Click Point Cutwork Line

, and starting at the base of the lower left wing, place points around the inner edge of the wing, finishing back where you started.
-
Adjust the points as desired, then right-click to place the cutwork line and deselect.
-
Click and drag in the overview window to view the top wing on the right.
-
Using Point Cutwork Line

and starting at the base of each wing, place points to set cutwork areas for first the upper, and then the lower wing on the right.
-
Click Zoom To Fit

.
-
Click the View tab.
-
Click 2D View with Stitch Points

to go to 2D view, so you can see the individual stitches more clearly.
-
Use the slider on the Zoom Bar to zoom in a little.
-
Click Draw All Stitches

.
-
Click Draw Next Color Block

once. The stabilizing line for the top left wing is drawn.
-
Click Draw Next Color Block

again.
-
Click Draw Next Color Block

a third time.
-
Click Draw Next Color Block

a few more times. The same structure is used for the cutwork and stabilizing lines in the other wings.
-
Click Zoom To Fit

, and then click Draw All Stitches

.
-
Click 3D View

to return to a realistic view of the embroidery.
-
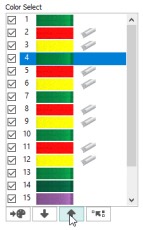
In the color worksheet, scroll down the list of color changes. There are now 18, but many of them are the same colors repeated.
Change the color order yourself when optimizing the order of designs with multiple areas of cutwork and stabilizing lines. ColorSort may occasionally merge stabilizing lines in these circumstances. -
Click the green color block in position 4.
-
Click Move Color Up

twice. What was green block number 4 is now below green block number 1.
Alternatively, right-click the color block and select Move Color Up from the context menu. -
Move the green color blocks at numbers 7 and 10 in turn to just below the green block that is now number 2.
This places the stabilizing lines for the four wings together at the top of the embroidery. -
Click the red color block in position 7.
-
Click Move Color Up

once. The red block that was number 7 is now below red block number 5.
-
Move the red blocks numbers 9 and 11 in turn to just below block number 6 (the block you just moved).
-
Click the green color block in position 4.
-
Click Merge into Previous Color

3 times. There is now one green block at the top.
-
Click the red color block in position 5.
-
Click Merge into Previous Color

3 times. There is now one red block.
-
Click the yellow color block in position 6 and merge the four yellow color blocks. There are now 9 colors in the color worksheet.
The Draw Range enables you to insert the cutwork line into this design, but to work accurately you must be able to see where the stitches after the cutwork line will be placed.
The stabilizing stitch line and the cutwork line can be placed before the rest of the embroidery.
This enables you to insert the cutwork stitches at the beginning of the embroidery.
With 2 needles, a bladed needle set at one angle is used to cut around the shape, and then the second needle travels around the shape cutting at a different angle.
The line cut through the fabric may have a sharper edge if a stabilizing line of stitching is placed before the cutwork line. This can prevent the fabric from shifting when the cutting needle moves in and out.
When the Move Node pointer is active you can adjust existing nodes.
If you click while the Point pointer

is active, another point will be added to the line.
The points for the cutwork needle and stabilizing lines are inserted automatically.
Surrounding the cutwork lines are the more widely spaced points for the stabilizing line. (As the points for the two cutwork lines are placed on top of each other, you cannot see the separate lines.)
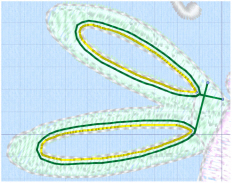
Note that new stitches (bright red and yellow) for the cutwork line, and for the stabilizing line (green) are visible on the colored slider bar in the Control Strip. The handle to the right moved as these stitches were inserted.
The bright red is the cutwork line for Inspira Cutwork Needle1, and the bright yellow is for Inspira Cutwork Needle 2. The green used for the stabilizing line is the green used in the wings. It is now in several places.
The green for the stabilizing line is the only selected color in the color worksheet.
The closely spaced (0.3mm) needle points are shown as a heavy line. The secure points (gaps) are shown as a thin red line.
A second cutwork line (the yellow in the color worksheet) has been placed directly on top of the first. The lines in the gaps for the secure points are now yellow, not red. This may be easier to see if Ghost Mode is temporarily turned off.
Alternatively, right-click the color block and select Merge into Next Color or Merge into Previous Color, as appropriate.
Do not move the green color block that is now in position 10. This is for the outlines of the wings and is stitched after the cutwork is placed.