Use Freehand Appliqué Hole  to draw a line of any shape to create a hole within the selected appliqué area.
Select the desired Appliqué Piece so its points are displayed, then draw a line to form the hole. Release the mouse button to complete the line. Any appliqué fabric is removed from the hole. Right-click to deselect.
Hold down Ctrl to place a corner point when creating or editing a line. Click Delete to remove the last-placed point.
Shortcuts
-
Create, Appliqué Tab:

-
Keys: Alt, A, AH, FT
Draw a Hole in an Appliqué Area
-
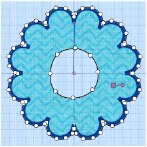
Click the Border tab, and click Add Appliqué.
-
Select the fabric of your choice, then use Border Shape

and draw an external border

-
Click the Appliqué tab.
-
In Appliqué Hole

, select Freehand Appliqué Hole

.
If Appliqué Hole is not available, click Next Piece
to select the appliqué piece, then click Appliqué Hole.
-
Draw a circle in the middle of your appliqué area. The hole is created.
-
The Right-click to deselect Freehand Appliqué Hole.