Use Previous Piece ![]() to select the previous Appliqué Piece in the stitchout order.
to select the previous Appliqué Piece in the stitchout order.
Previous Piece will select an appliqué piece even if no appliqué piece is currently selected.
Shortcuts
-
Select, Appliqué Tab:

-
Keys: Alt, A, P
Select Appliqué Pieces
-
Open mySewnet™ Embroidery, and click the SuperDesign tab.
-
Select the Appliqué Category.
-
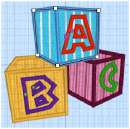
In the Children 1 SuperDesign set, select the 5th design, Blocks.
-
Click Apply to place the ABC blocks in the work area.
The embroidery has green handles, indicating that it is a SuperDesign. -
In the Home tab, click Copy

. The design is placed in the Clipboard block.
-
Open mySewnet™ Stitch Editor.
-
In the Home tab, click Paste

, then click Yes to continue. The blocks appear in the work area.
-
Click the Appliqué tab.
Note that the Select Piece icon
is available. This indicates that there is at least one apppliqué piece in the embroidery.

-
Click Select Piece

, then click the A block. The points outlining the appliqué appear.
-
Click and drag one of the points to change the shape of the appliqué.
Note that you can change the shape of the appliqué area, but this does not affect the satin border. -
Click Undo

to return to the original shape.
You can also use the Fabric Handle
to change the position and rotation of the fabric.
-
Click Next Piece

. The letter C block is now selected.
-
Click Previous Piece

twice. First the A and then the B are selected.
-
Click Delete Piece

. The appliqué fabric for the B block is removed, leaving the border lines for the block.
Use Style 1, with a satin line border.