Use the Appliqué Piece functions to add appliqué fabric to an existing design with appliqué areas, and to adjust appliqué areas within a design.
Use Express Appliqué  to automatically find appliqué areas in some existing embroideries.
Change the Fabric in an Appliqué Embroidery
-
Open mySewnet™ Embroidery, and click the SuperDesign tab.
-
Select the Appliqué Category.
-
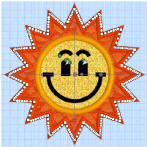
In the Children 1 SuperDesign set, select the 8th design, Happy Sun.
-
Click Apply to place the sun embroidery in the work area.
-
In the Home tab, click Copy

. The design is placed in the Clipboard block.
-
Open mySewnet™ Stitch Editor.
-
If there is an embroidery in the work area, click New

.
-
In the Home tab, click Paste

, and click Yes to continue. The sun design is placed in the work area.
If you click Select All Visible
you will see white or blue handles, indicating that it is now an embroidery. When a SuperDesign is copied and pasted between modules it is converted into an embroidery.
-
Click the Appliqué tab.
-
Click Next Piece

.
All of the appliqué functions are now available. -
The points for the outer appliqué area should be highlighted. If not, click Next Piece

until they are.
-
Click and drag the square zigzag fabric handle

. The fabric for the sun’s rays moves.
Use the Fabric Handle to move the origin point (center of design) of a tiled fabric. This handle
is only available for fabric tiles; you cannot rotate quick Appliqué or Pictures.
-
Click and drag the round handle. The fabric for the sun’s rays rotates.
The fabric rotates around the fabric handle (the origin point of the fabric tile). -
Click Select Fabric

. The Appliqué Selection dialog box opens.
-
To change the fabric, click Fabric in Appliqué Type, then click Load Previously Saved Fabric

and choose another fabric.
-
Click OK to close the Appliqué Selection dialog box.
-
Click Next Piece

. The points for the inner appliqué area are highlighted. You can now change, move or rotate the central appliqué fabric.
Use Style 1, with a satin line border.
It has green handles, indicating that it is a SuperDesign.