Use Express Appliqué  to automatically find appliqué stitches within the visible stitches of some existing embroideries, and apply an appliqué fabric to them.
Multiple appliqué areas can be detected in the same subdesign. Use the selection tools and Control Strip to hide areas where you don’t want appliqué added.
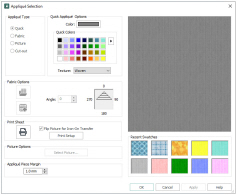
In the Appliqué window, select an appliqué embroidery with no fabric, click Express Appliqué  , then add a fabric in the Appliqué Selection dialog box. Optionally, adjust the overlap margin.
Express Appliqué detects the pattern of Stop and Color Change Commands used with appliqué placement stitches, and inserts appliqué fabric in that area. If an appliqué area is not detected automatically, use Freehand Appliqué Outline or Point Appliqué Outline to define it.
Shortcuts
-
Create, Appliqué Tab:

-
Keys: Alt, A, Q
Add Appliqué to a Sun Embroidery
-
Click Change Hoop
 . From the Universal Hoop Group, set the Hoop Size to 200mm x 200mm - Universal Square Hoop 3. Click OK.
 -
Click File, New
 to open a new window.
 -
In the Quick Access toolbar, click Insert
 .
.
-
Browse to the folder Documents\mySewnet\Samples\ Embroidery\Stitch and load the embroidery 'Sunshine Applique Large with Lettering'. The design contains three subdesigns.
Click Yes when told that the design will be fixed as stitches. The lettering is the part of the design that will be fixed as stitches. -
In the Home tab, click to select the first subdesign in the Design Select area (the sun embroidery).
This is the part of the design with an appliqué area. -
Click the Appliqué tab.
-
Click Express Appliqué

. The Appliqué Selection dialog box opens so you can choose a fabric for your appliqué.
Express Appliqué detects the pattern of Stop and Color Change Commands used by appliqué placement stitches and inserts appliqué fabric in that area.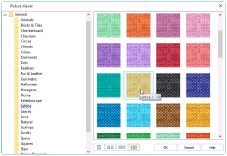
-
In Appliqué Type, click Fabric.
-
Click Load Previously Saved Fabric
 to load a fabric in the Picture Viewer.
 -
Browse to the folder General\Lattice.
-
Click the fabric Lattice 1 - 18, then click OK. The Picture Viewer will close and the fabric will be shown in the Appliqué Selection dialog box.
If desired, adjust the Appliqué Piece Margin. -
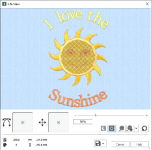
Click OK to close the Appliqué Selection dialog box. The fabric is shown under the sun’s face, as if you had stitched it down as an appliqué.
-
In the Quick Access toolbar, click Life View
 .
.
-
Move the Zoom Bar slider to the right so that you can see the embroidery clearly.
Note that the threads for the sun’s face and lettering are white. -
Click Solar Reactive
 . The white threads turn yellow and orange.
 -
In the Quick Access toolbar, click Save As
 and save the embroidery with the appliqué and background as ’Sunshine Applique Large with Lettering and Applique’.
The sun and lettering will be stored separately within this multipart embroidery, making further adjustment easier.
You may have to delete some additional appliqué pieces.