Basting Line for Visible Stitches
Use Basting Line for Visible Stitches  to insert a rectangular basting line automatically around the visible stitches. This will secure the fabric and stabilizer before beginning embroidery.
Set the margin and stitch length in the Basting Line section of Preferences  .
.
The basting line is automatically created immediately before the visible stitches using a medium gray color.

Shortcuts
-
Modify Design, Modify Tab:

-
Keys: Alt, M, BL, BL
Add a Basting Line to Sweet Rose Border
-
In the File menu, Click Configure to open mySewnet™ Configure

, then click the Appearance tab.
-
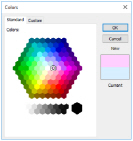
To change the Background, click the drop-down arrow and then click More Colors on the drop-down panel. The Colors dialog box appears, with the Standard tab selected.
-
In the hexagonal matrix, click the medium pink hexagon sixth from the right (just to the right of the central white hexagon). The color sample on the right will show the old and new colors.
-
Click OK. The new color is shown on the Color button.
This background color is similar to the fabric to be used for the embroidery. -
Click Apply and the new color will be seen on the Clipboard in mySewnet™ Stitch Editor. Click OK to close mySewnet™ Configure.
-
In mySewnet™ Stitch Editor

, click File, New

to open a new window.
-
In the Quick Access toolbar, click Insert

.
-
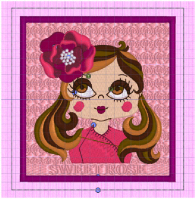
Browse to the folder Documents\mySewnet\Samples\Stitch Editor\Stitch, then select the embroidery 'Sweet Rose Border'.
The embroidery is loaded into the work area. -
Hover the pointer over the colors in the worksheet.
-
In the Home tab, click Color Tone

. The Color Tone dialog box appears.
-
In the Thread Range drop-down list, select Robison-Anton Rayon 40. The thread shades change a little.
-
Click OK to close the Color Tone dialog box.
-
Double-click the first color in the color worksheet (Robison-Anton Rayon 40 2203 Gold). The Color Selection dialog box appears.
-
Browse for thread number 2374 (Emily Pink) in the list and select it, or type 2374 in the Find Thread box.
-
Click OK to close the Color Selection dialog.
-
Click File, Preferences

.
-
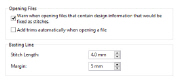
In Basting Line, ensure that Stitch Length is set to 4mm, and that Margin is set to 5mm.
-
Click the Modify tab.
-
Under Basting Line, click Basting Line for Visible Stitches

. A basting line is placed around the embroidery.
Alternatively, you could use the embroidery you created in Add a Satin Border to the Sweet Rose Embroidery.
All of the colors are Sulky, except the 13th color which is Robison-Anton. Use Color Tone to change the thread range.
The embroidery background would match the fabric background better if it used a paler shade.
This will secure the fabric and stabilizer before beginning the embroidery.
Note that the basting line is created using a gray color to contrast with the background fabric.
After placing the basting line around this embroidery, use the Appearance tab of mySewnet™ Configure to set the Background Color back to the default blue (RGB 211, 233, 255) in the Colors dialog box Custom tab. See the instructions at the beginning of this section.