Use Break Up Stitches ![]() to add extra stitch points to the embroidery so that no stitches are longer than the specified maximum length. This is useful to reduce the length of stitches if they are causing any difficulties during embroidery, however it does increase the number of stitches in the embroidery. Only visible stitches are affected.
to add extra stitch points to the embroidery so that no stitches are longer than the specified maximum length. This is useful to reduce the length of stitches if they are causing any difficulties during embroidery, however it does increase the number of stitches in the embroidery. Only visible stitches are affected.
It is recommended to use Break Up Stitches if some very long stitches are left when the Remove Needle Points in Fill function is used before stamping. If these long stitches are not broken up, they may be too loose when the embroidery is stitched out.
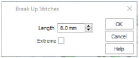
Set the maximum length of visible stitches in the current embroidery to between 2mm and 12mm. The initial setting is 8mm. Change the Length in steps of 0.1mm.
Use the Extreme setting to break up stitches that are hidden in 3D but visible in 2D. The Extreme setting is off by default and reset when the module is restarted again.
If you position the arrow pointer over the box without clicking, the alternative units and range will be shown.
Shortcuts
-
Modify Design, Modify Tab:

-
Keys: Alt, M, BU
Using Break Up Stitches
-
Click File, New

to open a new window.
-
In the Quick Access toolbar, click Insert

.
-
In the folder Documents\mySewnet\Samples\Stitch Editor\Stitch load the 'Girl with Rose' embroidery.
-
In the Control Strip, click Draw Next Color Block

once so that the background color behind the girl’s head is shown.
-
Click the Emboss tab.
-
Click Remove Needle Points in Fill

. The stitches making the flat fill pattern are removed.
-
In Stamps in the Category drop-down menu, select Games, then select stamp 11, a heart.
-
Click Single Stamp

, then click on the background area to place stamps in a few locations where a full stamp can be fitted.
-
Click the Modify tab.
-
Click Break Up Stitches

.
-
Enter the desired Length in the Break Up Stitches dialog box.
8mm is a good length to maintain the patterns that have been stamped, but removing long, loose stitches. -
Click OK to break up the stitches. Extra stitch points are inserted on the areas with stitches longer than your selected length.
This function works on the visible stitches. Hide colors and use Draw Range to isolate an area of the embroidery if you do not wish to affect the whole embroidery.