Use the Density Advisor ![]() (Modify tab) to view the density of the embroidery and, if desired, reduce the density where stitch points are tightly packed together.
(Modify tab) to view the density of the embroidery and, if desired, reduce the density where stitch points are tightly packed together.
View an embroidery with Density Advisor to determine if a particular embroidery may be troublesome when it is stitched out. Extensive areas of Very Dense or Super Dense stitching may cause difficulties such as thread and needle breakage. Isolated spots of dense stitching are unlikely to need adjustment.
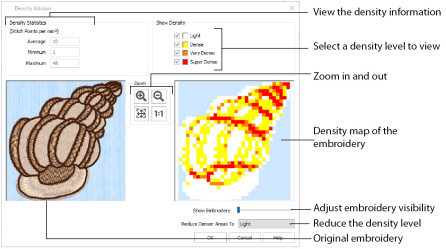
The embroidery is shown in 3D on the left, and a density preview on the right shows the density of stitch points in the embroidery.

Click OK to reduce the density as desired. Click Cancel to close the Density Advisor without making changes, after viewing the density map.
Only visible stitches are affected. It is not available if a block is selected.
If the Density Advisor does not give you the desired results, use Undo to reverse the effect of Density Advisor.
Using the Density Advisor
-
Click File, New

to open a new window.
-
In the Quick Access toolbar, click Insert

.
-
In the folder Documents\mySewnet\Samples\Stitch Editor\Stitch load the 'Hermit Crab Shell Dense' embroidery.
-
Click the Modify tab.
-
Click Density Advisor

. The dialog box appears.
-
In the Show Density area, use the checkboxes to view where the dense areas of stitching are.
-
Use the Reduce Denser Areas drop-down list to reduce the density of dense areas of stitching.
-
Close the dialog box to view your changes.
If you are not satisfied with the result, click Undo
and try again.
Shortcuts
-
Modify Design, Modify Tab:

-
Keys: Alt, M, DA
This shows the density of the stitches, per square millimeter. Average is the overall density of the stitches, Minimum is the lowest density and Maximum is the highest density.
This is not affected by the Show Measurements setting in mySewnet™ Configure.
Check and uncheck the desired options to show where the density is Light (up to 10 stitch points per mm²), Dense (up to 17 stitch points per mm²), Very Dense (up to 25 stitch points per mm²) or Super Dense (over 25 stitch points per mm²).
Use the Zoom Controls to zoom in and out, zoom to fit and zoom to Real Size.

Use Zoom In
to enlarge the view of an area of the 3D and density views.
Click Zoom In
and move the pointer over the 3D or density view. The mouse pointer changes to the zoom in pointer

. Then either click a point on the view you want to zoom in towards, or click and drag a rectangle around the area you want to zoom in to and release the mouse button to zoom.
When zoomed in, use the scroll bars to move around the 3D and density views.
Use Zoom Out to zoom out of the 3D and density views, to show more of the embroidery in each view.
Click Zoom Out
and move the pointer over the 3D or density view. The mouse pointer changes to the zoom out pointer

. Then click a point on the 3D or density view you want to zoom out from.
Click Zoom To Fit
to view all of the stitches in the Before and After views.
Click Real Size
to show the Before and After views at the Real Size selected in mySewnet™ Configure.
This is a drop-down list with options for Light, Dense and Very Dense. This determines the level of density reduction to apply when you click OK.
The density is reduced to the maximum allowed for the option you choose. For instance, if you choose Dense, then Very Dense and Super Dense areas will be reduced to 17 stitch points per mm².