Create Borders and Appliqué Areas
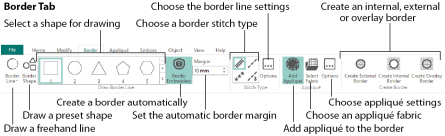
Use the Border tab to make a new embroidery by adding a satin, running, triple or motif border, optionally with placement stitches and fabric for appliqué. Use a preset shape for the border, draw your own freehand shape, or create a border automatically around an embroidery or selected stitches. There are three types of border:
-
Create External Border

Remove the stitches outside the shape that has been drawn and add a border around the stitches -
Create Internal Border

Remove the stitches inside the shape that has been drawn and add a border inside the stitches -
Create Overlay Border

Add the border on top of or with the existing embroidery
The border is always added at the end of the embroidery. If an appliqué option is used, the stitches for placing the appliqué fabric are added at the beginning of the embroidery.
All stitches, including stitches you may have hidden, are used when the new embroidery is created. If you wish to use only the visible stitches, use Select All Visible ![]() to select all the visible stitches, Copy
to select all the visible stitches, Copy  the stitches, and use Paste into New Window. Then draw a border shape and use the desired border and appliqué functions.