Use Border Embroidery  to create a border automatically around the selected embroidery or stitches, using an internal, external or overlay border, optionally with appliqué. Use Margin to set the distance between the selected stitches and the border.
Use a Running Stitch border line for a basting or cutwork line around an embroidery.
Shortcuts
-
Draw Border Line, Border Tab:

-
Keys: Alt, B, BE
Draw a Border Around an Embroidery Automatically
-
Select the Border tab in the ribbon bar.
-
Load an embroidery design.
-
In Stitch Type, choose the desired line type for the border and use Options
 to select its settings.
 -
If desired, select Add Appliqué
 to use appliqué with your border, select an appliqué fabric
  and click Options
  to set the appliqué type.
 -
Select the part of the design that you want to surround by a border.
If no part of the design is selected, the border will be placed around the whole embroidery. -
Set the Margin to the desired distance from the stitches in the embroidery.
The initial setting is 10mm. -
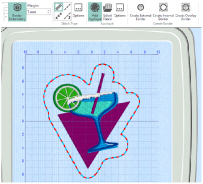
Click Border Embroidery
 . The position for the border is shown by a red and cyan dashed line.
-
If desired, adjust the Margin setting. The position of the preview line will change.
Holes within the embroidery, and some appliqué areas, will also have a border, each with its own color block. To remove one of these internal borders, after creation select its color block and delete those stitches. -
Click to select an External, Internal or Overlay Border. The border is placed around the embroidery.
Right-click to deselect Border Embroidery without placing a border.
If there are holes or appliqué areas within the embroidery, only the Create Overlay Border option may be available.
Set the distance between the selected stitches or embroidery and the automatic border. You can set Margin from 0 to 50 mm, in steps of 1mm. The initial setting is 10 mm.