Use Place Individual
to place decorations individually on your project.
Click Place Individual
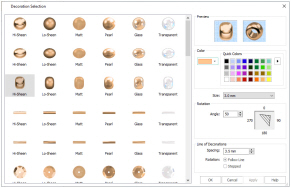
and select a decoration type, material, color, size and angle in the Decoration Selection dialog. Then click to place decorations. See Decoration Selection.
Shortcuts
-
Add Decoration, Embellish Tab:

-
Keys: Alt, D, P
Place Individual Beads on an Embroidery
-
Load the desired background and embroideries.
-
Position the embroideries as desired.
-
Click the Place Individual icon
 . The Decoration Selection dialog box will appear.
 -
Click to select the desired bead type and material.
-
Click the Color drop-down menu and use the Colors dialog box to select a color, or choose a color in the Quick Colors.
-
In Size, select the desired bead size.
-
Choose the angle of rotation of the bead in Angle.
-
Click OK to close the Decoration Selection dialog box.
-
Click in the work area to place the bead. Each click will place one bead.
-
When you have placed all the beads as desired, right-click and select "Finish placing individual" in the Context menu to end.
-
Repeat the process to place more beads as desired.
-
Use File, Export Decoration Template
 to create a crystal transfer template (or rhinestone template) for pressing hotfix crystals and nailheads directly onto your work. See Export Decoration Template.

The cursor changes to the Insert cursor  to show that you may place beads.
Click and drag will have no effect while placing beads. Use Undo to remove the last bead.