Use Satin Column  to place a column of satin in the work area.

Place alternate points to define a column of continuous satin (zigzag stitches that fill the column from one side to the other).
Click the Options button, or right-click a Satin Column to set density, compensation, pattern (for wide columns) and underlay.
Shortcuts
-
Freehand Create, Column; Point Create, Column:

-
Keys: Alt, R, S; Alt, P, S
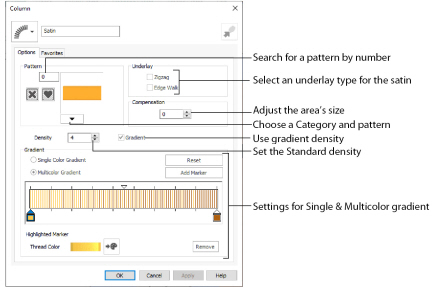
Use the Satin Column Options to set density, compensation, pattern (for columns wider than around 8-10mm) and underlay.
Column Type Selection
If desired, select a different column type from the drop-down list. Select from Feathered Satin, Richelieu Bars and Tapered Motifs.
If no column is currently selected, this option will be grayed out.
Click Convert to Satin Area  to change the column to a Satin Area. The Fill Area and Line properties dialog for Satin Area is displayed. See Satin Area Options.
Click Undo  to change back to a column.
Pattern
Choose from more than 250 patterns for satin (for areas wider than around 8-10mm). Click a pattern sample or enter the Pattern number to select a pattern. Set the Pattern number to 0 for standard satin with no pattern, or click No Pattern  . The initial setting is 0.
View the patterns in the pattern gallery. See Fill and Satin Patterns.
Patterns can only be used for columns wider than about 8-10 mm.
Underlay
Set the Underlay option that will be used for the satin column. Zigzag creates zigzag lines of running stitch as underlay. Use zigzag underlay for wide areas of satin. Edge walk places lines of running stitch just inside the edges of the satin column. Use edge walk when the satin columns have both wide and narrow sections. For very wide satin columns, select both underlay types.
Compensation
Compensation is used to make an area 'bolder' by increasing its relative size. Set Compensation from 0 to 30. The higher the number, the bolder the area appears. The initial setting is 0.
Density
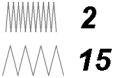
Set Density from 2 to 80. The lower the number, the closer together the stitches and the more stitches are produced. The initial setting is 4.
Gradient
Use the Gradient settings to see and change the density settings and the color Gradient of the satin.
The color on a satin column can change over a range, or have multiple color changes across the area. This is ideal for gradual color changes such as subtle shadow effects. Gradient is not initially selected.
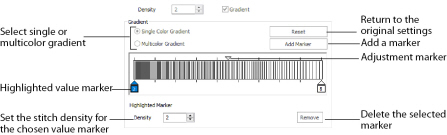
Use Single Color Gradient to change the density across a satin column with only one color. Set a value for the start and end density markers for the fill, and the density gradually changes between the two values. Add multiple markers for a more complex pattern.
The markers can each take a value of 2 to 80, which means you can reverse the gradient simply by swapping the start and end values.
Use the adjustment marker above the gradient bar to change the gradient across the area.
Use Reset to cancel your changes and use the initial settings.
Click Add Marker to add a value marker below the gradient bar, and an adjustment marker above the gradient bar. The initial value for the marker will be between the existing markers. Edit the density value, and move the value and adjustment markers as desired. This means that you can have any combination of density values across the area. A higher value means the fill is less dense.
Density is used to change the density of the stitching. Set Density from 2 to 80. The higher the number, the less dense the satin. The initial start marker setting is 4, and end marker setting is 4.
Click Remove to delete the highlighted marker.
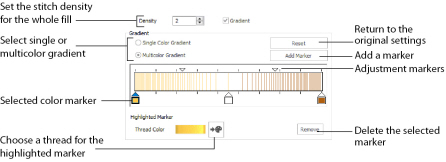
Use Multicolor Gradient to change the color across a satin column with only one density. Set colors for the start and end markers for the area, and the color gradually changes between the two values.Use the marker above the gradient bar to change the color gradient across the area.
Use Reset to cancel your changes and use the initial settings.
Click Add Marker to add a color marker below the gradient bar, and an adjustment marker above the gradient bar. The initial color for the marker will be the same as the currently highlighted marker. Change the color and move the color and adjustment markers as desired. This means that you can have any combination of colors across the area.
Use Thread Color  to change the color of the currently highlighted marker. The Color Selection box will be displayed.
Click Remove to delete the highlighted marker.