Create the Band and Feathers for a Fleur de Lys
-
Click File, New

, or File, New Window

, and in the Choose Design Type page of the ExpressDesign Wizard select Load Existing Design, then click Next. In the Open Existing design page, click Load a Design
 , browse to the folder Documents\mySewnet\Samples\Digitizing\Edo, and load the file 'Fleur de Lys Crosshatch and Base’.
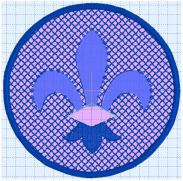
Alternatively, use the design from Creating and Changing Fills: Fleur de Lys Background and Base. -
Click File, Preferences
 , and ensure that Color Tolerance is selected (checked), and that Tie Off Before and After Trims is selected.
 -
Click the View tab, and ensure that Grid size is set to 5mm.
-
Click the Point Create tab.
-
Deselect the Fill and Appliqué buttons.
-
Click the Pattern Fill at the bottom of the FilmStrip.
-
In the Line drop-down list select Running Stitch
 .
.
Good digitizing minimizes the use of movement stitches, which slow down the embroidery machine even if they are trimmed automatically. We will use Running Stitch to travel to the next area of the design. -
Click Create Area or Line
 .
. -
Note the position of the Create Cursor
 . This marks the end of the last object in the design.
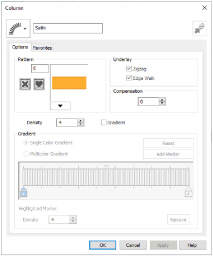
-
Move the pointer towards the Create Cursor, until it changes to the diagonal pointer
 .
.
The diagonal pointer indicates that the next object will be created from the same point as the previous one, with no movement stitch. -
Hold down the Shift key and click to place a square point at the position of the Create Cursor.
-
With the Shift key held down, place a point in the right corner of the band around the fleur de lys.
-
Then going in a counter-clockwise direction, place four more square points at the corners of the band, finishing in the right corner.
The running stitch line around the band will provide an outline preventing the satin stitches from pulling in. -
Right-click to complete the line.
-
In the Options area of the Create tab, click the Column button and select Satin Column
 in the drop-down menu. The Column properties dialog box opens at the Options tab for Satin Column.
 -
Set Density to 4, set Compensation to 0 and set Pattern to 0.
-
In Underlay select both Zigzag and Edge Walk.
-
Click OK to close Column properties.
-
In the Column area, click Satin Column
 . Place the first point for the satin column at the position of the Create Cursor
  , in the right corner of the band around the fleur de lys.
 -
Place another point as close as possible to the first using the place points pointer
 .
.
Adjust the position of the point if the move pointer appears instead.
 -
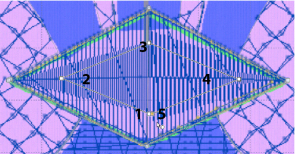
Place two points on the opposite sides of the center of the band, and two points next to each other in the left corner. This will create a diamond shaped area of satin stitch.

A minimum of four points is required to create a column. -
Right-click to finish the column.
-
Right-click again to deselect Satin Column.
-
Use Zoom To Rectangle
 to zoom in on the band around the fleur de lys.
 -
Right-click to deselect Zoom To Rectangle.
-
Click the View tab.
-
Click 2D View
 . The display changes to 2D.
 -
If desired, adjust the points for the band around the fleur de lys.
-
Click the Point Create tab.
-
Hold Ctrl and place five points to form a diamond shape within the band around the fleur de lys.
Use the grid as a guide when placing the points for embossing. -
Right-click to finish the embossed line.
-
Right-click to deselect Point Emboss Line.
-
Click Zoom To Fit
 .
. -
Click Life View
 to see the embossed band, then click Cancel.
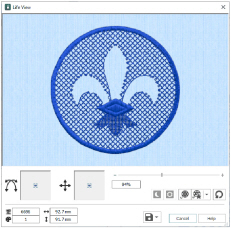
-
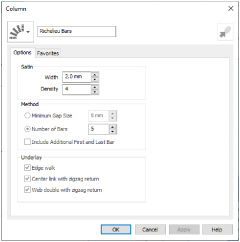
In the Options area of one of the Create tabs, click the Column button and select Richelieu Bars
 in the drop-down menu. The Fill Area and Line dialog box opens at the Options tab for Richelieu Bars.
 -
Set Width to 2.0mm and set Density to 4.
-
In Method select Number of Bars, and set the number to 5. Deselect (uncheck) ’Include Additional First and Last Bar’.
No additional first and last bar at either end of the area will be needed as the ends will be covered by a satin line. -
In Underlay select all three options.
-
Click OK to close Column properties.
For free-standing lace it is recommended to use all the underlay options to add stability. -
Click Richelieu Bars
 .
. -
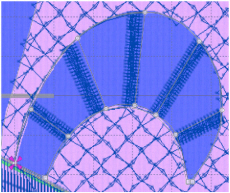
Place a point at the tip of the right feather of the fleur de lys.
-
Place a second point using the place points pointer
 , as close as possible to the first.
 -
Place a pair of points a little way down the feather.
-
Place five or six more pairs of points, following the curve of the feather.
-
Place two final corner points at the base of the feather.
-
Right-click twice to finish the bars, and to deselect Richelieu Bars.
-
Ensure that Running Stitch
 is selected as the Line type.
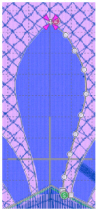
-
Click Create Area or Line
 .
. -
Hold Ctrl and place the first point of the line at the Create Cursor
 .
. -
With Ctrl held, place a second point where the right side of the middle feather meets the band around the fleur de lys.
-
Release Ctrl and place a series of points along the right side of the middle feather up to its tip.
This line of running stitch will later be covered by a satin border. -
Right-click twice to end the line and to deselect Create Area or Line.
-
Click Richelieu Bars
 .
. -
Place the first point for the Richelieu Bars at the Create Cursor
 ;, at the tip of the middle feather of the fleur de lys.
The settings are the same as for the right feather, so only check them if you think they may have changed. -
Place the second point as close as possible to the first.
-
Then place a pair of points a little way down the feather.
-
Place four more pairs of points, following the curve of the feather. Then place two final corner points at the base of the feather. Right-click twice to deselect.
-
Use Create Area or Line
 to create a line of Running Stitch
  to the tip of the left feather.
-
Click Richelieu Bars
 .
. -
Place two square points at the tip of the left feather of the fleur de lys. Then place five or six pairs of round points down the feather. Place two final corner (square) points at the base of the feather and right-click to deselect.
This places the second point for the satin column almost on top of the first.
 .
.
A line should join each pair of points, making parallel lines that run across the feather. If the lines run diagonally, click Undo  and try again, or edit the points after creation. You may optionally add more points using Insert Points in the Home tab.
The first and last pairs of points will automatically be square (control) points for any column, including Richelieu bars.
You may wish to move points to make the curve smooth.
Although the top of the diamond is included in this area, it will not be affected as there is no stitching here.
In the View tab click 3D View  to see the design in 3D.
To place an outline around the fleur de lys, see Outline the Fleur de Lys With a Satin Line.