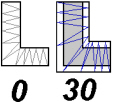
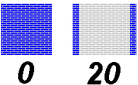
All stitches have a tendency to pull in. The pull varies according to fabric weight and type. Compensation is used to make a whole design or areas within it 'bolder' by increasing their relative size. The higher the number, the bolder the areas appear. You can also alter compensation for any individual area of satin or fill.
|
|
|
|
Satin Compensation |
Pattern Fill Compensation |
Embroidery on thicker fabrics usually looks better with higher compensation, while on thin materials such as satin or twill a lower value or zero setting is usually more appropriate. As you create a design, use overlaps to prevent pulling from creating gaps between blocks of stitches that have different stitch directions. This provides 'built-in' compensation.
Compensation may be set from 0 to 30 for satin and 0 to 20 for fill areas. The setting for any Satin Column  , Satin Area
 ![]() and Pattern Fill
and Pattern Fill ![]() in the design is shown in the Area and Line properties for that satin or fill.
in the design is shown in the Area and Line properties for that satin or fill.
Compensation does not apply to feathered satin, satin line, or any fill other than pattern fill.