Use Create Point Area or Line  to place points to create a line to define the edge of an area filled with small stitches in repeating patterns with or without a border, or an unenclosed line.
To draw the outline for a Line or Fill Area with Bezier Lines instead of Point Lines, click Bezier Mode  to enable drawing Bezier curves, then draw your Line or Fill Area. See Bezier Mode.
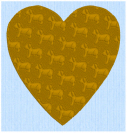
After the fill area has been created, right-click it to use Fill Area and Line properties to change the fill type or pattern, the density, stitch angle, underlay and compensation, and the border width, density and color. You can also add an applique layer.
Shortcuts
-
Point Create Tab, Fill Area and Line:

-
Keys: Alt, P, R
Create a Line or Fill Area with Create Point Area or Line
-
In the Point Create tab select your line and/or fill type.
-
Click the Create Point Area or Line icon
 .
. -
Click to place the first point. It appears as a small hollow yellow circle.
-
Click to place a second point. The new circle is now yellow, and the previous circle is white.
-
Continue placing points around the desired area, such as a chosen section of the background picture. If you are following the picture, place a point every time the direction of the picture outline changes.
-
Right-click to complete the area. Stitches will appear in the current thread color showing the line or fill area and border.
-
Continue to place as many objects as desired.
To draw the outline for a Line or Fill Area with Bezier Lines instead of Point Lines, click Bezier Mode  to enable drawing Bezier curves, then draw your Line or Fill Area. See Bezier Mode.
Curved lines are created automatically, unless fewer than three points are placed, in which case the lines will be straight. For corners and straight edges, hold down the Shift key. To delete the last point placed, use the Delete key.
To change the line and fill properties, right-click the line or fill area and edit the properties in the Fill Area and Line Properties dialog.
To edit the line or fill, or change the properties for more than one area at a time, use the FilmStrip. See Editing a Design.
Mitered Corners and Closed Shapes
When creating satin line by placing points, the corners of a satin border are mitered automatically when you hold down Ctrl and click to place a corner point. If you wish to make a closed shape with mitered corners, such as a square or rectangle, join the shape in the middle of one of the sides, as shown in the example. If the shape is joined at a corner, that corner will not be mitered as it will simply be two straight end points in the same place, rather than a true corner.
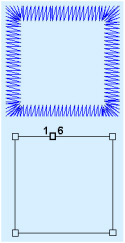
When drawing this type of satin line shape, overlap the start and end points slightly to ensure a neat join.