Use Freehand MultiWave Line  to draw a line that shapes the wave patterns in a MultiWave Fill.
|
|
|
|
|
MultiWave Fill, using two long MultiWave lines to shape the flow of the fill within a leaf |
|
MultiWave Fill, using a short MultiWave Line to add texture to an embroidery |
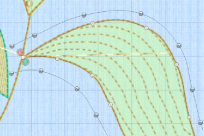
Use a long line to position the stitch lines in an embroidery, or use a short line to add texture to the stitching. The lines do not have to be within the fill area, however they should not cross each other. Vary the density or use a motif to change the effect.
Shortcuts
-
Freehand Create Tab, Enhance:

-
Keys: Alt, R, W; Alt, Q, W, F
Create a Freehand MultiWave Line
-
Select a MultiWave Fill area.
-
Click the Freehand Create tab.
-
Click the Freehand MultiWave Line
 icon.
icon. -
Draw a line over or near the selected area.
-
Repeat to place as many MultiWave lines as desired. Right-click to deselect the function.
The MultiWave line will appear on the fill, with the first point as a square and later points as circles, except for a square final point. The wave patterns in the fill will follow this line.
To follow a background picture, select 2D View  in the View tab, and zoom in as necessary.
You can move points after the line has been created. To add or remove points, use Insert Points  or Delete Points
  in the Home tab.
Use Delete MultiWave Line ![]() in the Edit tab to remove a MultiWave line. See Delete MultiWave Line.
in the Edit tab to remove a MultiWave line. See Delete MultiWave Line.