The select functions in the main toolbar allow you to select a block of objects. A selected block of objects can be resized, rotated, mirrored, moved, copied and cut.
-
Click on an object in the FilmStrip or work area to select it. Command–click or Shift–click in the FilmStrip to select additional objects individually or in a sequence.
-
Use the Select Mode tools to replace, add to, or remove from your selection. Replace Selection

replaces the selected objects, Add to Selection

adds the new selection to the selected objects, and Remove from Selection

removes the new selection from the selected objects.
Note: Use Control–click to finish using a select tool, or select a different create or select tool.
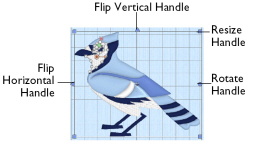
When a block has been selected, it has a selection box around it on the work area. The selection box has handles which are used to resize, rotate and flip the block.

Note: The handles are blue to indicate that you can freely manipulate the selection without changing density or stitch length in the objects. This is because the stitches are only generated when you use Export Embroidery.
Move and Resize a Block of Objects
-
Drag inside the block to move it.
-
Drag the square corner handles
 to resize the block.
Note: Hold down the Shift key as you drag to resize proportionally. Hold down the Option key to resize from the center.
-
Drag the round rotate handle
 to rotate the block freely.
 -
Click the triangular handles to flip the block horizontally
 or vertically
  .
.
Note: When making a selection, only objects that are completely enclosed by the selection line (box, freehand line) are included in the selection. If you cut across a Running stitch line when making a selection, it is not included because it was not completely enclosed in the selection.
Inserting or Pasting a Block
When a new selection is added to a design by paste or one of the insert functions, it is automatically selected as the current block.
Deselect a Block
-
Click the work area outside a block to deselect it. The selection box around the block will disappear.