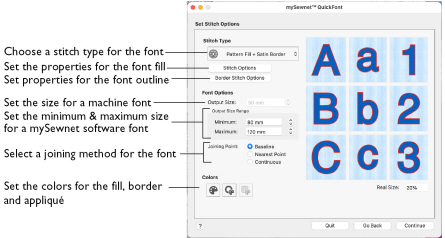
Use the Set Stitch Options page of mySewnet™ QuickFont to select the type of stitching used to create the characters, the default colors, the recommended size range or font size, and the joining method.
Select the Stitch Type and Character Size
-
Choose a Stitch Type in the pop-up menu, for example satin columns, fill with or without a border, appliqué or an outline.
-
Click the Stitch Options button to change the properties for satin columns, a fill or appliqué.
-
Click the Border Stitch Options button to change the properties for a border, appliqué border or outline in its properties dialog.
-
Click the Fill Thread Color
 button to change the color of the fill or columns in the Color Selection dialog.
 -
Click the Border Thread Color

button to change the color of the border or outline in the Color Selection dialog.
-
Click the Appliqué Color

button to change the color of the appliqué fabric in the Appliqué Selection dialog.
-
Use the arrows or enter a number in Output Size or Output Size Range to set the size, or maximum and minimum recommended size, for the font.
-
Select a Joining Point method.
The properties dialog for the stitch type opens. Make the desired changes and save.
Note: The suggested size varies according to the chosen stitch type. Output Size is for fonts used with an embroidery machine, and Output Size Range is for fonts used with mySewnet™ Embroidery Software.
Note: Baseline is for general use, Nearest Point is for running stitch connection in small fonts, Continuous is for script (handwriting) fonts.
Your selected stitch options are shown in the preview.