Use the Border Options ![]() to create a border to place around your embroidery.
to create a border to place around your embroidery.
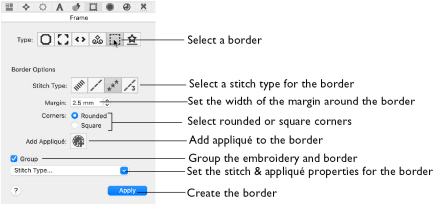
Select a border type, then set the margin width, and select rounded or square corners. Use Stitch Options to set the properties for each stitch type and for appliqué.
Note: The stitch properties may only be adjusted before the border is created.

The border is placed around the rectangular "edge" of the currently selected embroidery, or around the inside edge of the hoop. (In the ExpressMonogram Assistant, the border is placed around the edge of the envelope area.)
Note: If more than one embroidery is selected, the border is placed around the selected embroideries. If no embroidery is selected, the border is placed around the inside edge of the hoop.
The border is placed with white handles or blue handles, depending on the Resize  mode.
mode.
Create a Border
-
Load an embroidery in the work area and select it.
-
Open the Frame
 window.
 -
In Type, select Border
 .
. -
Select a Stitch Type (Satin Line, Triple Stitch, Running Stitch or Motif Line).
-
If desired, click Options to open the properties dialog for the stitch type. See Choosing Stitch Properties.
-
Change the stitch properties for the border in the properties dialog, for example the density and stitch length. Click OK to close the dialog.
-
If desired, click Add appliqué
 to place an appliqué piece behind the embroidery and border. Use Appliqué Fabric and Appliqué Options in the Stitch Type popup menu to set appliqué type and to choose a fabric. See Appliqué Selection.
 -
Set the Margin size in millimeters from -50 mm to 50 mm.
-
Select Rounded or Square corners.
-
If desired, select Group to keep the border and the embroidery as a unit.
-
Click Apply in the Border window to view your framed embroidery.
Note: For a satin or motif border you may need to adjust the margin to avoid overlapping the embroidery.
Rounded corners may overlap the corners of the embroidery. Adjust the Margin for the desired effect.
Stitch Types
Use Stitch Type to select the appearance of the stitching used in the border. The stitch types available for automatically created borders are:
-
Satin Line

-
Triple Stitch

-
Running Stitch

-
Motif Line

-
Click Stitch Options to set the properties for a stitch type. The properties dialog for that stitch type will open. See Choosing Stitch Properties.
For the individual stitch types, see Satin Line, Triple Stitch, Running Stitch and Motif Line.
Appliqué
In Appliqué, use Add Appliqué

to create an appliqué piece to place behind the embroidery and border. Use Appliqué Fabric and Appliqué Options in the Stitch Type popup menu to set appliqué type and to choose a fabric for that appliqué piece. See Appliqué Selection.
Margin
Margin leaves a space between the embroidery and the center of the border around it. Margin can be set between -50mm and 50mm. The initial setting is 2.5mm.
Note: For a satin or motif border you may need to adjust the margin to avoid overlapping the embroidery.
Corners
Use rounded or square borders. Rounded is initially selected.
Note: Rounded corners may overlap the corners of the embroidery. You can adjust Margin for the desired effect.
Group
Place the border and the embroidery as a unit on the work area.
Note: Use Reveal Groups  to move and change the embroidery and border separately. See Reveal Groups.
Apply
Place the framed embroidery on the work area.