The flourish is placed at a size to suit the selected embroidery. If there is no selected embroidery (or more than one selected embroidery), the flourish default size is used.
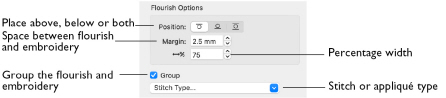
Position
Above

: Place the flourish above the selected embroidery (or embroideries).
Below

: Place the flourish below the selected embroidery (or embroideries).
Duo

: Place vertically mirrored flourishes above and below the selected embroidery (or embroideries).
Margin
Margin leaves a space between the embroidery and the flourish.
-
Click the arrows to set Flourish margin from -50mm to 50mm.
Percent Width
Adjust width

to change the size of the flourish.
Percent width can be set from 10% to 200% of the original size, in steps of 1%. The properties stay the same until you change them or close mySewnet™ Embroidery.
Group
Group the flourish with the embroidery when it is placed on the work area.
Note: Group should usually be selected. If Group is not selected, the flourish can be moved separately. Deselect Group if you want to move the flourish after placing it. Use Reveal Groups  when changing stitch properties in a grouped embroidery or flourish.
Stitch Type
Use Stitch Type to alter the appearance of the stitching or appliqué used in the frame.
Note: If the Stitch Type area is dimmed, this means that the frame was designed with properties that cannot be edited. This is usually because the properties vary within the frame set.
Changes made to the stitch properties for a frame set are retained until a new frame set is selected.
To change the Stitch Type
-
Select a stitch type or appliqué from the pop-up menu to open the properties dialog for the stitch type. See Choosing Stitch Properties.
Apply
Click Apply to place the frame around the selected embroidery, or on the work area if no embroidery is selected.