Use Reveal Groups  to select and edit individual designs within a group. Reveal the contents of Groups in the FilmStrip, and temporarily disable all groups in the work area. The designs remain grouped, but they can be edited, moved, rotated, mirrored and resized or scaled independently.
Change a single design in a group with Reveal Groups
-
Select a group of designs, and then at the bottom of the FilmStrip click Reveal Groups
 . Move or change any design within the group as desired.
 -
Select a group of designs, then Control–click the group and in the Context menu choose Reveal Groups. Move or change any design within the group as desired.
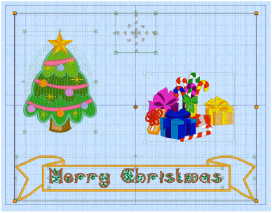
Christmas Greetings: Multiple Select and Group Designs
-
Click Hoop
 in the toolbar, and in the Universal Hoop Group choose 260mm x 200mm - Universal Large Hoop 3, in Rotated orientation. Click OK.
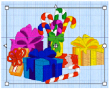
-
Choose File > New to open a new window, then choose File > Insert.
-
In the folder mySewnet/Samples/Embroidery/Stitch load the embroidery 'Gifts & Candy Canes'.
Note: This is an embroidery; it has white handles showing that it is initially in Scale rather than Resize mode.
mode. -
Move the embroidery to the right side of the hoop.
-
Open the SuperDesign window
 of the Control Panel
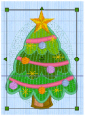
  and choose "1 - Christmas Tree" in the Holidays Category.
 -
Set the Size of the SuperDesign to 90mm, then click Apply.
Note: The SuperDesign has green handles. For more about SuperDesigns, see Creating SuperDesigns. -
Move the christmas tree SuperDesign to the left of the hoop, a little above the gifts embroidery.
-
Open the Letter window
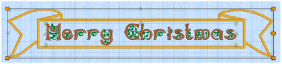
 and enter the words "Merry Christmas" in the Letters box.
 -
In the Font pop-up menu choose the font Ivy 2C 15-60mm in the Floral Category. Ensure that the lettering Shape is horizontal block, and the Size is 15mm.
-
Click Apply and move the lettering towards the bottom of the screen, in the middle.
-
Open the Frame
 window.
 -
In Type, click the Frames
 button, and choose banner 3 in the Banners 2 category.
 -
Make sure that Group is selected (checked). This places the banner and lettering as a Group.
-
Ensure that the Merry Christmas lettering is selected, and click Apply. The banner is placed around the lettering.
-
In the Category section of the Embellish window
 select Decoration
  , then click Insert from Gallery
  .
. -
Browse to the folder DecorationDesigns/Miscellaneous, select the design Cross 2, and click OK to load it into the work area. The Decoration Gallery design Viewer closes.

-
Control–click the decoration design and select Pearl Sequin Cup 4.0 mm in the Context menu.
-
Click Color, and in the Colors window, set the sequin color to white, then click OK.
-
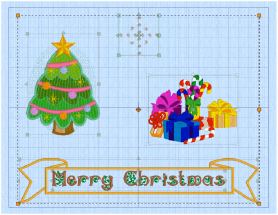
Move the Decoration Gallery design to the top center, to look like a star. It also has green handles.
-
Press Command and the left or right key to see each design in turn. Each is in a selection box or group with a solid outline and orange, green or white handles.
-
Use Box Select
 or Select All Visible
in the toolbar to select all of the designs. The selection box for the selected designs has a dotted outline and orange handles.
-
Drag to move the selected designs as a unit, and use the round handle to rotate the selection.
-
Use Edit > Undo to reverse your changes.
-
Click outside the hoop. The designs are separate again.
-
In the ribbon bar, note that the Group
 and Ungroup
  buttons are not available (are dimmed).
 -
Use Select All Visible

to select the designs again. The Group button is now available.
-
Click Group
 . The selection box for the group has a solid outline.
 -
Click outside the group. None of the designs is selected.
-
Click the Christmas tree. The whole group is selected again, and the Ungroup
 button is now available.
 -
In the FilmStrip, click Reveal Groups
 . The Reveal Groups button is highlighted; and the last placed or adjusted design, here the decoration, is selected.
 -
Click Reveal Groups
 again. The group is now a single unit, and the Reveal Groups button is no longer highlighted.
 -
Click Ungroup
 . The designs that were in the group now form a selection.
 -
Drag to move the selected designs. They move as a unit.
-
Click outside the selection box. The designs are now separate.
Note: The lettering has green handles. For more about lettering see Creating Lettering.
Note: The selection box around the banner has orange handles and a solid outline, as it is a Group. The lettering inside has a faded outline and pale green handles. For more about Frames, see Frames, Borders & Underlines.
For more about Decoration Gallery designs, see Decoration Gallery Designs.
Note: Ensure that the corner handles for the selection box are square. If not, move the designs so that all are within the hoop and try again.
Note: The faded outlines and handles for the designs within the group can still be seen.
Note: Groups are permanent until they are broken apart with Ungroup. You cannot use Command and the left or right arrow to move between the designs within a group.
With Reveal Groups active you can select and edit the designs within the group individually, for example you could adjust the position of the Merry Christmas lettering within the banner, or change its properties.
Note: The lettering and banner are no longer grouped together, because there is only one level of grouping. A group cannot contain subgroups.
Note: While the block is still selected you can reverse the effects of Ungroup by using either Group or Undo.
Note: Use Ungroup to make major changes to a group, or to use the designs within the group separately.