Use the Frame or Flourish properties dialog to change the size, and the percentage width

and height

of a frame that has been placed on the work area.
Note: Changes made in the Frame properties dialog will undo any adjustments made using the selection box handles.
To change a frame before you click Apply, use the Frame Options dialog.
Note: Frame properties may not be changed once the design has been converted to embroidery, for example if Fix as Stitches has been used.
To open Frame Properties
-
In the work area, Control–click the frame, and select Properties from the context menu.
Note: You must Control–click directly on the frame. If you click outside the frame, a different context menu will appear.
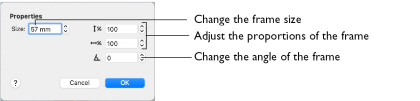
Size
Frame size can be set from 5mm to 200mm. This is the height of the frame.
Height and Width
Use Height

and Width

to adjust the proportions of the frame. For instance, to make the frame taller without increasing the width, increase the height.
Height and width can be set from 25% to 400% of the original size, in steps of 1%.
Rotation
Rotate the frame to the desired angle.
Changing Frame Properties
Use the Frame properties dialog to change a frame after it has been placed, but before it has been fixed as an embroidery.
Note: You cannot change the frame with Frame properties. Create a new frame instead. To change the stitch type or appliqué, Control–click the frame and select it from the context menu. See Stitch Type.
-
Control–click within the frame and select Properties from the context menu. The Frame properties dialog appears.
-
Adjust Size to change the basic size of the frame.
-
Click the arrows for height and width to change the proportions of the frame. Alternatively, enter a size in the number box.
-
Click OK to apply your changes to the selected frame.