Use the Hoop Selection dialog to choose a hoop size for use with a cross stitch design in mySewnet™ Cross Stitcher.
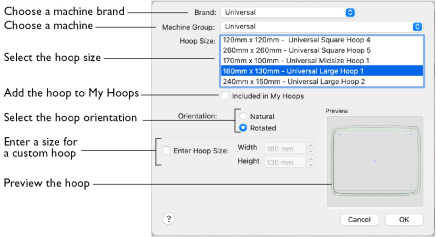
Brand
The pop-up Brand menu shows all the machine brands, and Universal hoops.
Hoop Group
The pop-up Machine Group menu shows all the machine Hoop Groups.
Note: All available hoops for the selected machine are listed.
Hoop Size
The Hoop Size list shows the hoops in the chosen Hoop Group. A picture of the selected hoop is shown in the Preview.
Included in My Hoops
The Included in My Hoops checkbox is used to add hoops to the My Hoops list. Use this to create a list of your favorite hoops.
Note: The selected hoops are displayed in the My Hoops group in the order that they were chosen.
Orientation
Select Natural or Rotated orientation according to the shape of the embroidery that is to fit in the hoop.
Enter Size
Use Enter Size to enter a hoop size that is not listed in any of the Hoop Groups. You can enter any size from 10mm to 2000mm in the width and height boxes.
Note: If you position the arrow pointer over the box without clicking, the alternative units and range will be shown.
Choose a Hoop
-
Choose a Brand from the pop-up menu.
-
Choose a Machine Group from the pop-up menu.
-
If desired, add the hoop to your My Hoops list.
-
Select the hoop orientation.
-
Click OK to use the hoop in the work area.
Select a machine brand, or use Universal.
Select the name of a machine, or a group of similar machines.
The hoop is shown in the preview.
Enter a Size for a Custom Hoop
-
Select the checkbox labelled "Enter Hoop Size".
-
Enter the dimensions in the height and width number boxes.
-
Click OK to use the hoop in the work area.
Your custom hoop is shown in the preview.