Use Design Separator  to break an embroidery into two parts. Place a line to enclose the area of the embroidery you wish to split. The embroidery is split along this line. Both parts can be seen in the Design Select area of the Design window.
|
|
|
|
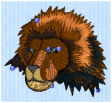
The original embroidery |
A separated section |
Design Separator can be used to cut out a section of an embroidery you wish to keep, or to cut away a section of an embroidery you wish to discard. This may be preferable to making a selection and then using Cut, as Design Separator creates a clean split with traveling stitches where it is necessary to move along the split line. Design Separator may also be used to split an embroidery into two complete sections for stitching out.
If you want to keep the split sections then you must save them.
Note: Use Split Design  to split a large design for stitching out in multiple hoopings. To automatically split an embroidery for stitching out multiple hoopings in a particular hoop, use the Split Project Assistant in mySewnet™ Embroidery.
Using the Design Separator
-
Select an embroidery, and in the Modify
 window of the Control Panel
click Design Separator
 . Place a line to enclose the area of the embroidery you wish to split, and Control-click and choose Finish Design Separator Tool to split the embroidery.
Separating for Cutting Out
Note: Use these steps when separating an embroidery to cut out or cut away a section.
-
If required, choose File > New.
-
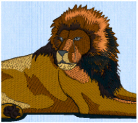
In the folder mySewnet/Samples/Stitch Editor/Stitch load the 'Lion' embroidery.
-
Click Draw All Stitches

to ensure that all stitches on the work area can be seen.
-
If desired, select 2D View with Stitch Points

and View > Grid Off to see all details, and Zoom In

to the area around which you will place the separating line.
-
Select the Modify

window in the Control Panel

.
-
Click Design Separator

. The pointer changes to the place point pointer

.
-
Click the desired start point for your cut line. If possible, choose a start point in clear space as this will make it easier to see where you started.
-
Click to place more points. This is the line along which the embroidery will be cut.
-
Use Shift–click to place square nodes for straight lines.
-
Move the pointer over one of the nodes on the line. The pointer changes to the Move Node pointer

. Adjust the node as desired.
-
Click points until you are at or near the start point again.
-
Control–click and choose Finish Design Separator Tool to split the embroidery. The split is calculated.
-
Select the Design

window in the Control Panel

.
-
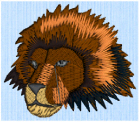
There are now two designs in the Design Select area, the head and body of the lion. The part that is not selected uses automatic ghost mode.
-
Save the split sections.
Note: This is recommended as Split Design cuts through all stitches whether or not they are visible. Alternatively, ensure Ghost Mode
is selected.
Note: As you click the third point on the line, the line becomes closed (it becomes a loop). As you place more points the line adjusts itself. The line may ’swing’ while you place points. Just carry on, you can adjust it afterwards.
When you cross stitching in the embroidery, try to avoid following outlining stitches as this may fragment the outline.
Note: When the Move Node pointer is active you can adjust existing nodes. If you click while the Point pointer

is active, another point is added to the line.
Note: The dark thread color has been hidden and shown in Ghost Mode. This makes it easier to see where to place the cut line.
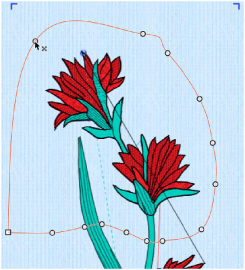
Separating for Stitching Out
Note: Use these steps when splitting an embroidery for stitching out in sections.
-
If required, choose File > New.
-
In the folder mySewnet/Samples/Stitch Editor/Stitch load the 'Large Flower' embroidery.
-
Click Hoop

to select a hoop size large enough for the embroidery, or use Enter Size to set a temporary custom hoop size. Click OK after selecting your hoop.
-
Click Draw All Stitches

to view all of the stitches in the embroidery.
-
If desired, select 2D View with Stitch Points

and View > Grid Off to see all details.
-
Zoom In

to the end of the hoop where you will place the cut line.
-
Select the Modify

window in the Control Panel

.
-
Click Design Separator

, and then click to place the first point outside the hoop. Click on one side of the section of the embroidery where you wish to cut across.
-
Click points to place a cut line across the embroidery to the opposite side of the hoop. When you cross stitching in the embroidery, try to follow the angle of the stitches. Also, avoid following outlining stitches as this may fragment the outline.
-
Click two or three points around the outside of the hoop to go around one end of the hoop in long steps and return to the start point.
-
Adjust the nodes with the Move Node

pointer as desired.
-
Control–click and choose Finish Design Separator Tool to split the embroidery.
-
Select the Design

window in the Control Panel

.
-
Choose Edit > Cut. The selected part of the split embroidery is cut.
-
Choose Edit > Paste into New Window.
-
Click Hoop

to change the hoop size to the hoop you will use to stitch out the sections. Click OK after selecting your hoop.
-
Click Select All Visible

, then click Center in Hoop

.
-
Save the section as Large Flower_2, and Print a worksheet for this section at 100%, to use as a template when stitching out.
-
Choose Window, and the name of the other window.
-
Change to the hoop you will use to stitch out this section, and select and center the section. Then save the section as Large Flower_1, and Print a worksheet for the section at 100%.
Note: It is particularly useful to see any movement stitches when splitting for stitching out in sections, as this may help avoid creating unnecessary short stitches.