Select, Move and Merge Designs
Use the arrows in the Design Select area to change the order of the designs, and to select designs to merge together.
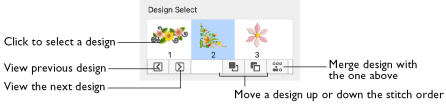
Note: Automatic Ghost Mode is used to show the position of the other parts of the design in the work area.
Use Merge Design if you are confident you will not wish to move the sections separately, and if there are few or no overlapping stitches.
Select a different design
-
Click the design in the Design Select window.
-
Click Previous
 , choose Design > Display Previous Design, or press ⌘← to display the design above the selected design in the Design Select window.
 -
Click Next
 , choose Design > Display Next Design, or press ⌘→ to display the design below the selected design in the Design Select window.
Move and merge designs
-
Click Move Design Backwards
 below the Design Select area to move the selected design up the stitching order.
 -
Click Move Design Forwards
 below the Design Select area to move the selected design down the stitching order.
 -
Click Combine with Previous
 to merge the selected design with the design above it.
Note: To remove overlapping stitches when combining designs, use Export with the Combine and Remove Overlap option checked. See Export.
Move and Merge Dragonflies and Bees
-
If required, choose File > New.
-
Click Hoop

and from the Universal Hoop Group, set the Hoop Size to 240mm x 150mm - Universal Large Hoop 2. Set the Orientation to Rotated. Click OK.
-
Select the Design
 window of the Control Panel
  .
. -
Choose Edit > Insert > Insert Design and in the folder mySewnet/Samples/Stitch Editor/Stitch, load the following embroideries in this order: 'Floral Beehive’, ’Three Bees’ and ’Three Dragonflies’.
-
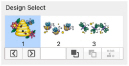
In the Design Select area, click the beehive.
The dragonflies and bees are shown in automatic ghost mode. -
Click Select All Visible
 . The beehive is surrounded by a selection box.
 -
Drag the beehive embroidery to the bottom of the hoop.
-
In the Design Select area, click Next Design
 . The three bees are selected.
 -
Click Select All Visible
 . The bees are surrounded by a selection box.
 -
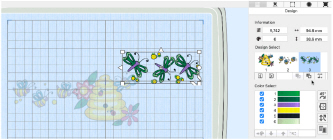
Drag the bees to the left of the hoop, so that the antennae of the bee on the right overlap the red and yellow flower by the hive.
-
Select the dragonflies and drag them to the right so that the yellow bubbles underneath the dragonfly on the left overlap the wings of the bee to the right of the beehive.
-
Click Life View
 . This shows the whole project as it will be stitched out.
 -
Click Close to close Life View.
-
In the Design Select area, click the dragonflies.
-
Click the Move Design Backwards button
 below the Design Select area twice to move the dragonflies to the top of the stitching order.
 -
In the Design Select area, click the bees to make them the active section of the multipart design, then click Combine with Previous
 . The bee and hive designs are merged, and are both now fully visible in the work area.
The embroideries are loaded into the center of the work area.
Note: The embroideries are shown in the Design Select area in the order that you loaded them. This is also the stitching order.
Note: Click a design in the Design Select area to select it, or use Previous Design  and Next Design
  to browse through the sections of a multipart design.
The hive was loaded first, so it is stitched out before the bees and dragonflies. This works well for the overlapping antennae on the left, but on the right it would be better if the bee by the hive was placed over the yellow bubbles.
The dragonflies are now above the hive in the Design Select area, and will be stitched out first.
Note: Use Move Design Forwards  to move a design down the stitching order.