Use the Density Advisor ![]() to view the density of the embroidery and, if desired, reduce the density where stitch points are tightly packed together.
to view the density of the embroidery and, if desired, reduce the density where stitch points are tightly packed together.
View an embroidery with Density Advisor to determine if a particular embroidery may be troublesome when it is stitched out. Extensive areas of Very Dense or Super Dense stitching may cause difficulties such as thread and needle breakage.
Note: Isolated spots of dense stitching are unlikely to need adjustment.
Select Density Advisor
-
In the Modify
 window of the Control Panel
  , click Density Advisor
  .
. -
Choose Design > Density Advisor.
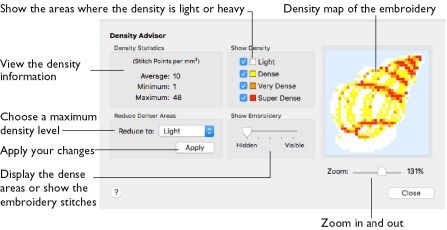
A density map shows the density of stitch points in the embroidery.
Using the Density Advisor
-
Open an embroidery to view its density.
-
In the Modify

window of the Control Panel

, click Density Advisor

.
Note: The complete embroidery is shown, not a selected block. -
In Show Density select the stitch densities to display.
-
Drag the Show Embroidery slider to view the embroidery and the density map.
-
Choose a maximum density level from the Reduce Denser Areas pop-up menu, then click Apply.
-
Click Close when you have finished changing the density.
Note: Use Undo to reverse the effects of Density Advisor.
Density Settings
Density Statistics: This shows the density of the stitches, per square millimeter. Average is the overall density of the stitches, Minimum is the lowest, and Maximum is the highest density.
Note: This is not affected by the Show Measurements setting in mySewnet™ Configure.
Show Density: Select options to show where the density is:
-
Light (up to 10 stitch points per mm²)
-
Dense (up to 17 stitch points per mm²)
-
Very Dense (up to 25 stitch points per mm²)
-
Super Dense (over 25 stitch points per mm²).
Zoom: Use the slider to zoom in and out.
Reduce Denser Areas: Choose the level of density reduction from the pop-up menu, then click Apply. The available options are Light, Dense and Very Dense.
Note: The density is reduced to the maximum allowed for the option you choose. For instance, if you choose Dense, then Very Dense and Super Dense areas are reduced to 17 stitch points per mm².