The motif group, category and set are shown in the Motif Underline ![]() section of the Frame tab.
section of the Frame tab.
The motif line is created below the currently selected embroidery(ies), group, lettering or SuperDesign, and earlier than it in the stitchout order.
Additional motifs may be created using the optional mySewnet™ Digitizing module, and added to the My Motifs database.
When starting mySewnet™ Embroidery the star (Pattern 5 in General Motifs 1) is selected. If you have used the Motif tab previously in that session of mySewnet™ Embroidery, the last motif and its settings are remembered.
Create Lines of Butterfly Motifs
Use Select Motif
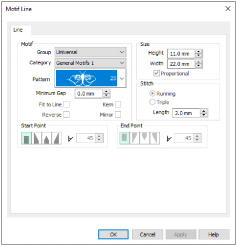
to select the motif for your line. The Motif Line dialog box opens. See Motif Line.
Set the Length of the line of motifs from 10 to 1000mm in steps of 1.0mm. Length is initially set to 100mm.
The total number of copies of the selected motif in the line. Set the number of repeats from 1 to 100.
Group the motif underline and the embroidery when they are placed on the work area.
Use Apply
to place the line of motifs in the work area.
Create Lines of Butterfly Motifs
-
Click the Frame tab, then click Motif Underline
 .
.
-
In the Motif Underline section, click Select Motif
 . The Motif Line selection dialog box opens.
See Motif Line. -
Select Universal from the Group drop-down list.
-
Select General Motifs 1 from the Category drop-down list.
-
In the Pattern drop-down list, select motif 23, a butterfly.
The Height and Width are initially set according to the chosen motif. -
In Size, ensure that Proportional is selected (checked), and set Height to 14mm.
-
In Stitch ensure that Running is selected, and that Length is set to 2.0mm.
Length is initially set to the recommended value for the motif. -
Click OK to select the butterfly motif.
-
In the Motif Underline section of the Frame tab, click Length to select it.
-
Use the up and down arrows to set the Length to 100mm.
-
Click Apply
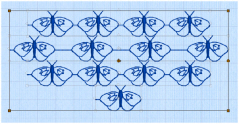
 . A line of four butterflies is placed on the work area.
 -
Set Length to 120mm and click Apply
 again. There are still four motifs, but they are more widely spaced.
Only complete motifs are used when placing a motif line with Motif Underline.
Note that the second line of butterflies forms a group with the first line. Motif lines are grouped with the previously placed line, unless you click outside the selection box before creating the new line. -
In the Motif Underline section, click Repeats.
-
Use the up and down arrows to set the number of repeats to four, then click Apply
 .
.
The motif line is the same size as the first line you created. -
Use the down arrow to set the number of repeats to one, then click Apply
 . This places a single motif in the work area.
The width of the butterfly motif is 25mm, so the line contains four motifs.
You can resize or rescale this line of motifs, or change its color, in the same way as for any other design.
Use Encore to create curved motif lines, circles and shapes using single motifs, and to mirror motifs within a line. See Encore.