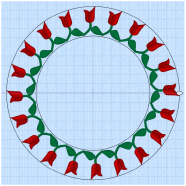
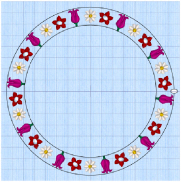
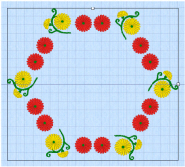
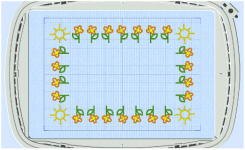
Use the Encore tab features to place repeated copies of embroideries in a line, a circle or a shape, or around the edge of the hoop.
Choose the number of repeats, or the margin and gap, and the number of embroideries used. Set the position to standard or mirrored. Click Preview ![]() to see the Encore, and Apply
to see the Encore, and Apply ![]() to place the repeated embroidery in the work area according to the chosen Finalizing options.
to place the repeated embroidery in the work area according to the chosen Finalizing options.

Use any number of embroideries with a line or circle, but only one or two embroideries with a shape or a hoop. To use more embroideries, you may Group ![]() them before choosing Encore.
them before choosing Encore.
With Line and Circle you can choose the number of Repeats. For Shape and Hoop the number of repeats is set by the size of the embroidery, the Gap and the Margin.
Repeat an Embroidery with Encore
-
Place a small embroidery on the work area and select it.

-
Click the Encore tab.
-
Select an Encore type (circle
 , line
  , shape
  or hoop
  ) and Position (standard
  or mirrored
  ), and any other options for that Encore type.
A preview image illustrates the chosen layout. -
Set the number of Repeats, or the Gap.
-
Click Preview
 to view the repeated designs in the work area.
While in Preview mode it is not possible to select any other function in the Quick Access toolbar. If you click another tab, the Encore will be cancelled. -
Adjust the Encore line or shape on the work area. Alternatively, adjust the settings on the Encore tab and click Preview
 again.
 -
If desired, select Group and (if designs overlap) Arrange Similar.
-
Click Apply
 to place the repeated designs as an embroidery with the chosen finalizing options.
Drag inside the Encore shape to resize, drag the handle to reshape, e.g. to change a circle into an ellipse.
Shortcuts
-
Encore Tab
-
Keys: Alt, E
In Encore the designs are repeated in order of their stitching out, from back to front. For Encore Shape or Hoop the embroidery that is first in the stitchout order will be placed in the corners. To change the order use the Stitch Order commands.
Encore repeats an embroidery clockwise for Circle, Shape and Hoop, and from left to right for Line. If you combine multiple designs before using Encore, try to work from left to right. This will prevent trimmed threads from becoming caught under elements in the same color block.
Encore repeats the selected designs in a circle, line, shape or hoop using the chosen position and number of repeats.
Encore repeats an embroidery clockwise for Circle, Shape and Hoop, and from left to right for Line. Therefore, if you wish to group multiple design elements before using Encore on the grouped result, try to work from left to right. This will prevent trimmed threads from becoming caught under elements in the same color block.
With Line and Circle you can choose the number of Repeats. For Shape and Hoop the number of repeats is set by the size of the embroidery, the Gap and the Margin.
Encore repeats designs in stitchout order, from back to front. In Shape and Hoop the embroidery that is first in the stitchout order is placed in the corners. Stitchout order can be changed with the Stitch Order commands.
Encore repeats an embroidery clockwise for Circle, Shape and Hoop, and from left to right for Line.
Shortcut
-
Keys: Alt, E, T
|
Circle |
|
Place the embroideries in a circle. |
|
Line |
|
Place the embroideries in one of 8 line options from left to right. |
|
Shape |
|
Place up to two selected embroideries around the edge of a shape. |
|
Hoop |
|
Place up to two selected embroideries around the hoop edge. |
|
|
The copies of the embroidery use the original orientation. |
|
|
|
Each alternate copy of the embroidery is reflected. |
You can use any number of embroideries with a line or circle, but only one or two embroideries with a shape or a hoop. To use more embroideries, Group them first.
Use Circle
to place the embroideries in a circle and set the number of repeats. Adjust the circle to form an ellipse.
After clicking Preview
, click and drag inside the circle to position the circle as desired. Click and drag one of the embroideries to make the circle smaller or larger.
Click and drag the white handle to reshape the circle to form an ellipse.
When adjusting in an ellipse, you cannot overlap the two sides of the ellipse. When adjusting in a circle, you can overlap at the center of the design.
-
Click the SuperDesign tab.
-
In the category drop-down list, select Flowers.
-
In Flowers 1, click the first flower, then click Apply

. The flower is displayed in the work area.
-
Add the second and third flowers to the work area; they will each be added in the center.
-
Click the Home tab, then click Select All

to select the three embroideries.
-
Click the Encore tab.
-
In Type, select Circle.
-
In Repeats enter 30.
-
Click Preview

. The three SuperDesigns are displayed in a repeating sequence around the edge of the circle.
-
Click on the embroidery at the top, and drag it downwards. The circle becomes smaller, and the embroideries move closer together.
You can also click and drag the white handle to reshape the circle to form an ellipse. -
Change the number of Repeats and preview again.
If you change to Hoop or Shape and preview, you will notice that only the first two flowers that you selected are in the Encore. -
Ensure Group is selected and if the designs are overlapped, select Arrange Similar.
-
Apply

to create the final, repeated embroidery.

Use Line
to place the embroideries in one of eight line types from left to right. Use Line Options to select the Line Type.
The Line Options are only available when the Type is set to Line.
Line Type
Select a straight line, or one of seven types of curved line from the drop-down menu.
To Adjust an Encore Line
-
Drag the line using the four-headed arrow Move pointer

to position it.
-
Drag the square handle on the top or right side of the line, using the double-headed horizontal or vertical pointer, to change the spacing between the designs.
Create a Line of Repeated Embroideries
-
Place some small embroideries on the work area and select them.
-
Click the Encore tab.
-
In Type, select Line

.
-
Select the Position (standard

or mirrored

).
-
Choose a Line Type from the drop-down menu.
The first option is a straight line. The other seven line types are curved.
-
Set the number of Repeats as desired, from 2 to 360.
-
Click Preview

to view the repeated designs in the work area.
-
Drag the line of embroideries to position it.
-
Drag the square handles on right side and top of the box to stretch or compress the box, and change the spacing.
-
Ensure Group is selected and if the designs are overlapped, select Arrange Similar.
-
Click Apply

to place the repeated line as an embroidery.
With a straight line, only the handle on the right is available.
Use Shape
to place up to two selected embroideries around the edge of a shape. Use Shape Options to select from 50 shapes.
The Shape Options are only available when the Type is set to Shape.
Shape
Select your shape from the drop-down list of 50 shapes.
Remove Corners
The embroidery is repeated along the sides of the hoop, with one embroidery placed at 45 degrees in each corner of the hoop. Select the Remove Corners option if you do not want the 45 degree embroideries in the corners. This option provides flexibility to create attractive designs with embroideries of different sizes and shapes.
If two embroideries are selected, the embroidery that is first in the stitch-out order will be placed in the corners. Use Stitch Order to change the order.
Use Repeated Embroideries in a Shape
-
Place two small embroideries on the work area and select them.
-
Click the Encore tab.
-
In Type, select Shape

.

-
Select the Position (standard

or mirrored

).
-
Choose a Shape from the drop-down list. There are 50 shapes to choose from.
-
Ensure that Remove Corners is not selected.
-
Set the Gap between the embroideries.
-
Click Preview to view the repeated designs in the work area.
The embroidery that you loaded or created first is in the corners. -
Drag the shape to position it.
-
Drag the square handles on the top and right sides of the box to adjust the shape, and change the number and spacing of the embroideries.
-
Ensure Group is selected and if the designs are overlapped, select Arrange Similar.
-
Click Preview

to view the repeated designs in the work area.
-
Click Apply

to place the shape as an embroidery.
Place up to two selected embroideries around the edge of the hoop, to make a border or frame.
If two embroideries are selected, the embroidery that is first in the stitchout order is placed in the corners. Use Stitch Order to change the order.
The Hoop Options are only available when the Type is set to Hoop.
The embroidery is repeated along the sides of the hoop, with one embroidery placed at 45 degrees in each corner of the hoop. Select the Remove Corners option if you do not want the 45 degree embroideries in the corners. This option provides flexibility to create attractive hoop borders with embroideries of different sizes and shapes.
If two embroideries are selected, the embroidery that is first in the stitch-out order will be placed in the corners. Use Stitch Order to change the order.
The maximum size limit for Encore Hoop is 2000mm.
Use Margin to leave space between the repeated embroideries and the edge of the hoop. This is useful if, for example, you wish to make the embroidery Endless, as this will leave a margin for adjustment in the hoop when stitching out.
The minimum Margin is zero. The maximum Margin varies, depending on the hoop size.
Use Repeated Embroideries in a Hoop
-
Place two small embroideries on the work area and select them.

-
Click the Encore tab.
-
In Type, select Hoop

.
-
Select the Position (standard

or mirrored

).
-
Ensure that Remove Corners is not selected.
-
Set the Gap between the embroideries.
-
Set the Margin between the line of embroideries and the hoop.
-
Click Preview. The Encore forms a frame around the inside edge of the hoop.
-
Adjust the Margin and Gap as desired.
-
Ensure Group is selected and if the designs are overlapped, select Arrange Similar.
-
Click Apply

to place the Encore as an embroidery.
The embroidery that you loaded first is in the corners.
Use Standard
to place copies of the embroidery in the original orientation one after another around the circle, shape or hoop, or along the line.
Use Mirror
to reflect alternate copies of the embroidery.
This generally looks best if the number of Repeats is an even number.
Set the number of repeats in the Encore by changing the gap, or setting the number of repeats.
-
For Line and Circle, select the number of Repeats.
-
For Shape and Hoop, set the Gap between the repeated embroideries.
This option is only available for Line and Circle.
The total number of copies of the selected embroidery(ies) that will make a circle or line of repeated embroideries. Set the number of repeats from 2 to 360.
Where more than one embroidery is selected, divide the number of repeats by the number of selected embroideries to give the number for each. For example, two embroideries using 10 repeats will produce five of each embroidery.
Generally, the larger the initial embroidery, the fewer Repeats should be made.
This option is only available for Shape and Hoop.
Use Gap to set the minimum spacing between repeated embroideries. If necessary, the actual spacing is increased where the Gap value would cause incomplete embroideries on either side of the hoop. So the spacing between repeated embroideries may differ on the long and short sides of the hoop.
Increase the Gap to move the embroideries further apart. Decrease the Gap to move the embroideries closer together. Use negative Gap to overlap embroideries by up to 50%.
Set the Gap in steps of 0.1mm. The default Gap is 2.0mm.