Use the SuperDesign options dialog box to change the size, and the percentage width
and height
of a SuperDesign that has been placed on the work area.

To change SuperDesigns before you have clicked Apply, use the SuperDesign tab.
SuperDesign properties may not be changed once the design has been converted to embroidery.
To open SuperDesign properties, right-click the SuperDesign, and select Properties from the Context menu.
SuperDesign size can be set from 5mm to 200mm. This is the height of the SuperDesign.
Use height
and width
to adjust the proportions of the SuperDesign. For instance, to make the design taller without increasing the width, increase the height.
Height and width can be set from 25% to 400% of the original size, in steps of 1%.
Changing SuperDesign Properties and Stitch Type
Use the SuperDesign options dialog to change a design after it has been placed, and even after saving, but before it has been fixed as an embroidery.
You cannot change the design itself with SuperDesign Properties. Create a new design instead. To change the stitch type, right–click the SuperDesign and select the stitch type from the Context menu. See Choosing Stitch Properties.
-
Right-click the SuperDesign and select Properties from the Context menu. The SuperDesign Options dialog appears.
-
Adjust Size to change the basic size of the SuperDesign. It is recommended to use a size within the range suggested in the SuperDesign guide.
-
Click the arrows for percentage width

and height

to change the proportions of the SuperDesign. Alternatively, enter a size in the number box.
-
Click OK to apply your changes to the selected SuperDesign.
Each SuperDesign has its own default size. The default size is set automatically each time a SuperDesign is selected.
You can change each proportion from 25% to 400% of the default setting in steps of 1%.
To change the stitch types or appliqué pieces within the SuperDesign, right-click the SuperDesign and select the desired stitch type area or appliqué fabric from the Context menu. The properties dialog for the stitch type, or the Appliqué Selection dialog box for that appliqué appears. See Choosing Stitch Properties and Appliqué Selection.
Changing SuperDesign Stitch Types
-
Open the SuperDesign tab and choose "Holidays" from the SuperDesign Category drop-down menu.

-
Click the arrow to the right of the SuperDesign set drop-down menu and choose Christmas 1.
-
Click the sixth design in the set, Reindeer.
-
Set Size to 120mm, and click Apply

.
-
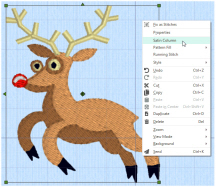
Right-click the SuperDesign.
-
Near the top of the Context menu three stitch types are listed. Click Satin Column. The Satin Column properties dialog box opens.
-
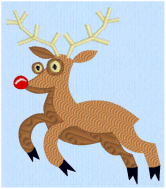
Change the density to 10 and click OK. The stitch density of the antlers, and detail on the eyes and nose has become less dense.
-
Right-click the reindeer again and click Pattern Fill in the Context menu. A submenu with three options appears.
-
Click Pattern Fill 1, and change the pattern in the fill to 230. Then click OK. The upper body is now patterned, with the curves following the contours of the deer.

-
Open the Pattern Fill submenu again, and click Pattern Fill 2. Change the pattern in the fill to 237 and click OK. The lower body is now patterned with broad curves.
Try different effects on different stitch types and see how the SuperDesign changes. You can add a pattern, change the stitch density, or make other changes to personalize the design.
Changing SuperDesign Appliqué
-
Open the SuperDesign tab and choose "Appliqué" from the SuperDesign Category drop-down menu.

-
Click the arrow to the right of the SuperDesign set drop-down menu and choose Children 1.
-
Click the fifth design in the set, Blocks, and click Apply
 .
. -
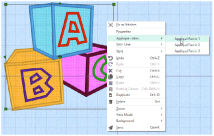
Right-click the SuperDesign.
-
Near the top of the Context menu Appliqué Fabric and Satin Line are listed. Click Appliqué Fabric in the Context menu. A submenu with three options appears.
-
Click Appliqué Fabric 1. The Appliqué Selection dialog box appears.
-
Click Load Previously Saved Fabric
 and choose a different colored fabric.
 -
Change the other fabrics in the blocks.
You can also change the angle of the fabric pattern, and use the Color Select area to change the thread color for the border. See Appliqué Selection.