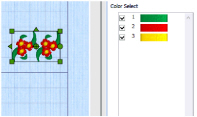
You can change the colors of SuperDesigns before or after they have been fixed as embroideries.
-
Open the SuperDesign tab and choose "Borders" from the SuperDesign Category drop-down menu.
-
Click the arrow to the right of the SuperDesign set drop-down menu and choose Borders 1.

-
Click the final design in the set and click Apply

.
-
Click the Home tab.
The thread colors for the SuperDesign can be seen in the Color Select area. -
Double-click the top color in the list. The Color Selection dialog opens. See Change an Existing Thread Color for more information.
-
Change this pale green to a deeper green.

-
Click OK to close the dialog.
The green has changed in the Design window and in the SuperDesign in the work area. -
Undo

the color change. The SuperDesign has returned to its original colors.
If you plan to create many of the same SuperDesigns using Duplicate
or Encore, it is recommended to change colors before creating the additional ones. Alternatively, you may Combine

and ColorSort

, and then change the colors.
SuperDesigns with Appliqué and Effects
For appliqué fonts, SuperDesigns, and frames the fabric can be changed as well as some of the border settings. For example, in Stitch Type ![]() select Appliqué Fabric, and in the Appliqué Selection dialog change the fabric, angle and margin. See Appliqué Selection. The appliqué placement stitches cannot be edited, but the position of the placement line may be adjusted to match the appliqué piece margin.
select Appliqué Fabric, and in the Appliqué Selection dialog change the fabric, angle and margin. See Appliqué Selection. The appliqué placement stitches cannot be edited, but the position of the placement line may be adjusted to match the appliqué piece margin.
The position of the pattern in an appliqué fabric may only be changed after fixing as stitches.
For effects such as Felting Needle, Twin Needle and Wing Needle you can change the stitch properties in Stitch Type ![]() or in the Context menu after creation. Change the Felting Needle color from the color select area in the Design Panel. Change to the appropriate needle before stitching.
or in the Context menu after creation. Change the Felting Needle color from the color select area in the Design Panel. Change to the appropriate needle before stitching.
Stitching out an Appliqué SuperDesign
Appliqué SuperDesigns are designed to be stitched out in a particular sequence. They are created with the standard appliqué options, to trim on the machine. Preview the two stops in the Design Player, with instructions to place the fabric and to trim it. These instructions are also present on the printed worksheet.
If you are using pre-cut pieces (with outlines created in Export Appliqué Pieces for a fabric cutter or INSPIRA® Cutwork Needles), the second stop can be ignored as there is no need to trim. It may also be useful to match the placement line to the appliqué piece margin, to ensure the placement line is visible.
When stitching out an appliqué embroidery, do as follows:
-
Begin embroidering. A running line will show where to position the appliqué fabric.
-
A stop then allows you to place the fabric. The message "Place the appliqué fabric now" is displayed.
-
Stitch down the appliqué fabric with double stitch.
-
The machine stops again, and the message "Cut around the appliqué" is displayed. Trim the fabric.
-
Finally, finish the edges with the satin or motif line.
-
Stitch out any other appliqué pieces in the SuperDesign.
When stitching out an appliqué frame, the placement section in the appliqué is the same color as the first color in the frame, so it doesn’t show under the appliqué fabric. If desired, change in mySewnet™ Embroidery to the first color for the embroidery.
Stitching out with Twin Needles
Twin Needles only work horizontally, i.e. the needles are side by side as you look at the machine. If the hoop orientation or the exported design is rotated, this will affect the stitchout of the design.
Stitching out with Wing Needles
A wing needle creates holes in the fabric, for hemstitch and other heirloom techniques. Use a very fine thread and a stabilizer to create evenly placed durable holes.
Stitching out with Felting Needles
Use a felting needle, optionally with a contrasting roving fiber, for the felting color chosen in the Color Selection dialog box. In projects without a roving fiber, choose a felting needle color similar to the back of the fabric.
When Exporting an embroidery with a Felting Needle effect, the option "Flip design for felting or reverse embroidery" is initially selected in the Export dialog box. See Export.