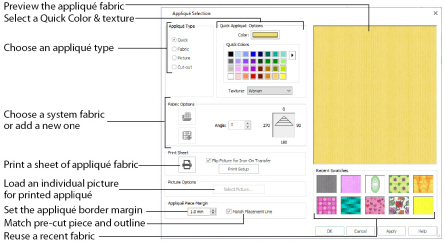
Use the Appliqué Selection dialog box to change and add appliqué fabrics.
You can only change the pattern position of the appliqué pieces for fixed embroideries. To change the appliqué fabric pattern position for lettering, SuperDesigns and Frames, fix as an embroidery. To change the fabric or angle only, or the appliqué piece margin, use the context menu.
Use the Appliqué Selection dialog box to select a fabric or picture to use for appliqué. Click OK to use the selected appliqué fabric.

Choose an appliqué type (or simply select one of the recently used swatches). Select from:
-
Quick
Select a color and texture for your fabric. See Quick Appliqué Options. -
Fabric
Select a background fabric, or add a new background fabric from a picture. Set the angle for the fabric. See Fabric Options. -
Picture
Create an individual non-tiling appliqué from a picture. For instance, use a photo for a printed appliqué memory piece. See Picture Options. -
Cut-out
Create an appliqué placement line as a guide to where the fabric should be cut to form a hole; for example, for reverse appliqué.

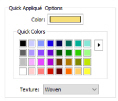
The Quick Appliqué Options are available when Quick is selected in Appliqué Type. In the mySewnet™ QuickFont Wizard only the Quick Appliqué options are available.
Select a color and texture for your fabric.
Color
Click the color sample to change the color in the Colors dialog box. See Colors Dialog Box.
Quick Colors
Click one of the Quick Colors to select a color for the fabric. Use the drop-down menu to choose a different Quick Colors theme, or to create your own theme. See Quick Color Themes.
Texture
Select the texture to use for the fabric. Click on the down arrow and choose the desired fabric type.

The Fabric Options are available when Fabric is selected in Appliqué Type.
Load Previously Saved Fabric
Use Load Previously Saved Fabric
to load a sample fabric, or a fabric from My Fabrics, in the Background Picture Viewer. See Background Picture Viewer.
Add New Background Fabric
Use Add New Background Fabric
to create a new fabric background in the Background Wizard. See Background Wizard.
Angle
Use Angle to change the angle at which the pattern will be displayed.
You may also change the angle and position of the fabric pattern directly by selecting the appliqué piece in the work area.
Enter an Angle from 0 to 359 degrees. The initial setting is 0. Alter the Angle by entering a number in the box, or use the up and down arrows to change the number. Changes in Angle are visible in the preview pane.
Print a sheet of appliqué fabric from the selected Quick Appliqué or Fabric pattern. Flip the picture for an iron-on transfer, and select a printer and paper size in the Print Setup dialog box. See Print Setup.
The Picture Options are available when Picture is selected in Appliqué Type.
Click Select Picture to create a picture background in the Load Picture Wizard. See Load Picture Wizard.
Fabric Preview
The chosen fabric is previewed on the right.
Recent Swatches
Select a recently used fabric to use again.
Set the margin for appliqué placement relative to the drawn border shape from -10mm to 10mm. The initial value is 1.0mm.
Use a positive value when trimming the appliqué fabric before the border is stitched, for example with Standard Appliqué and Pre-placed Appliqué. A negative value is recommended for cut-out and reverse appliqué.
Appliqué Piece Margin is only available when adjusting appliqué lettering, SuperDesigns and Frames using the Stitch Types options or context menu.
Use the Appliqué Piece Margin and Match Placement Line settings in Preferences to override the initial appliqué placement settings for lettering, SuperDesigns, Frames and Flourishes. See Appliqué Piece Margin.
Adjust the position of the first running stitch line for either Standard Appliqué or Pre-cut Piece so that it matches the outline of the appliqué piece after the Appliqué Piece Margin has been applied.
This may be useful for precise positioning of appliqué pieces that have been pre-cut with an automated cutter, to ensure the placement line is visible.