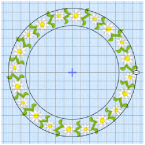
Create a SuperDesign Daisy Chain
Use Encore to create a circle of SuperDesigns.
-
Open the SuperDesign tab.
-
Choose "Borders" from the SuperDesign Category drop-down menu.
-
In the SuperDesign set drop-down menu, ensure that the Borders 1 set is selected.
-
Click the flower design number 3.

-
Ensure that Size is set to 18mm.
-
Click Apply

and the flower SuperDesign appears on the work area.
-
Click the Encore tab. See Encore.
-
Ensure that the Encore Type is set to Circle

.
-
Ensure that Position is set to Standard

.
-
Set Repeats to 6.
-
Ensure that Group is selected.
-
Click Preview and a circle of daisy designs appears on the work area.
The daisy designs appear a little sparse. More designs would create a better circle. -
Increase the number of Repeats to 10 and click Preview again. The circle now looks more balanced.

-
Drag the top of the circle downwards until the daisy designs meet.
-
Click Apply

. The daisy design now forms a group.
-
Look at the Design Panel. There are three colors for each embroidery in the group.
Use Reveal Groups on the FilmStrip or context menu to adjust individual daisies in the chain. When exported, your chain may have three or more colors, depending on the amount that the flowers overlap.
Use Combine, ColorSort and Remove Overlap when exporting to reduce the number of thread color changes, and to prevent areas of stitches building up if repeated embroideries overlap. See Export.
