Use lettering to enhance an embroidery, or create a monogram.
Create a Circle of Letters: I Love the Sunshine
-
In the Quick Access toolbar, click Change Hoop

. In the Hoop Selection dialog box select 260mm x 200mm - Universal Large Hoop 3.
-
Set Orientation to Natural and click OK.
-
In the View tab, ensure that the Grid size is set to 10mm.
-
In the Quick Access toolbar at the top of the screen, click Insert

.
-
Browse to \mySewnet\Samples\Embroidery\Stitch.
-
Scroll down until you see "Sunshine Applique Large".
-
Click Open to load the embroidery into the work area.
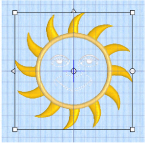
The embroidery has white handles on its selection box, showing that it is initially in Scale rather than Resize
mode (blue handles).
-
Click the Letter tab.
-
In the font gallery on the left, scroll down to the Traditional font category.
-
Select the font Georgia 20-40mm.
It will be automatically selected if this is a new mySewnet™ Embroidery window. -
Enter the words "I love the" in the Letters text box.
-
In the Lettering Shape area, click Circle Clockwise.
-
In Stitches, ensure that ColorSort is selected (checked).
-
Click Apply

. The lettering appears in the center of the work area above the embroidery. Its handle is green.
-
Press the Tab key so that the sun embroidery is selected.
-
In the Letters text box, enter the word "Sunshine".
-
In the Lettering Shape area, click Circle Counter-Clockwise, and ensure that ColorSort is selected (checked).
-
Click Apply

. The lettering appears in the center of the work area surrounding the embroidery. Its handles are green.
-
Drag the square green handle at the bottom of the circle of lettering upwards half a grid square.
The circle becomes smaller, but the size of the letters is unaffected.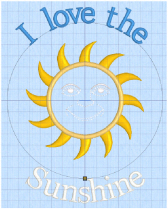
-
Click the "I Love the" text, and drag the square green handle at the top of the circle of lettering downwards half a grid square
-
Look at the Design Panel on the right. The phrase has a single color block in the Color Select area.
-
Select the Sunshine text, then move the arrow pointer over the color block and pause for a moment. The word ’Sunshine’ is highlighted, and a popup description of the thread is displayed.
-
Double-click the color block. The Color Selection dialog box appears.
-
In Thread Range choose Show All Thread Ranges, then select Solar Active Ultra Violet 40 from the drop-down list.
-
Select thread color 0002 (White/Orange). Click OK to change the color.
The word Sunshine is now white.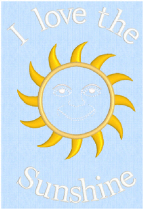
-
Select the "I love the" text.
-
Double-click the blue (number 1) in the Color Select and in the Color Selection dialog box choose Show All Thread Ranges, then select Solar Active Ultra Violet 40 from the drop-down list.
-
Select thread color 0001 (White/Yellow) and click OK to change the color.
-
Click the Home tab.
-
Click Select All

, then in Alignment, click Center in Hoop

. Both the sun embroidery and the lettering are centered in the hoop.
-
In the Quick Access toolbar, click Life View

.
-
Click Solar Reactive

. The sun’s face and the lettering change from white to yellow and orange.
Solar Reactive simulates the sun shining on the photochromic threads in the design. The threads change shade to show the colors they will become in sunlight. -
In the Quick Access toolbar, click Save As

and save the embroidery as ’I love the Sunshine’.
The sun and lettering will be stored separately within this multipart embroidery, making further adjustment easier.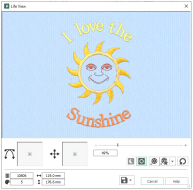
-
Click Export

in the Quick Access toolbar to export the sunshine embroidery.
-
In the Export dialog box, ensure that .vp4 is selected and click OK.
-
In the Save As dialog box, browse to \mySewnet\My Designs, and save the embroidery as ’I love the Sunshine_exported’ (a .vp4 file extension is added automatically).
When exported, the embroidery is automatically combined and ColorSorted if those options are selected.
To add appliqué to this embroidery, see Add Appliqué to a Sun Embroidery’.
The green handle indicates that the lettering has not yet been fixed as stitches.
If the lettering does not surround the embroidery, the embroidery was not selected. Click Undo
, click to select the embroidery, then click Apply again.
If the thread color for both lines is identical, you can use Full Circle instead of Circle Clockwise and Circle Counter-Clockwise.
-
Click the Letter tab and in the Font drop-down gallery, scroll to the Monogram font category.
-
In the Monogram font category, select Athletic Square 2C UC 30-80mm.
-
Enter the letters "OTG" in the Letters text box.
-
In the Lettering Shape area, click Horizontal Block.
-
Select the checkbox labeled "Individual".
-
In the Stitch Type

drop-down menu, select Pattern Fill.
-
In the Patterns gallery of the Pattern Fill properties dialog box, scroll to the Diamonds Category.
-
Click the pattern in row 1, column 1 (number 97).
-
Click OK to return to the Letter window.
-
Click Apply

. Each letter forms a separate block, with its own handles.
-
Drag the lettering towards the top of the screen. The pointer changes to the Move

pointer, and the lettering moves as a block.
-
Click outside the lettering. None of the letters are now selected.

-
Click the "T". It alone is surrounded by a selection box.
-
Drag the top right green handle up and to the right, until the T is approximately twice the height, and one and two-thirds the width, of the other two letters.
-
Drag the T to the left so that it is midway between the two letters.
Alternatively, use the arrow keys to nudge the T into position.
This forms a simple three-letter monogram. -
Click the Home tab.
As only the T is selected, only the two threads for the T can be seen in Color Select.
When Individual is used, there is a color block for each color in every letter. -
Click Select All

. All three letters are surrounded by selection boxes again. See Select All.
-
Click Group

. The three letters are grouped as a single design. See Group.
These fonts have most characters of equal width, designed for monograms created using the lettering functions or the ExpressMonogram Wizard. They are all uppercase only.
This is a two–color monogram font.
Since this is an uppercase font, it is not required to enter uppercase letters.
Note that the ColorSort checkbox is unavailable, as each character is created separately.
The stitch type can be changed in the Letter tab before the lettering is created. To change the stitch type for lettering placed in the work area, right-click each letter separately and select the stitch type from the Context menu.

The threads for all three letters are now visible in Color Select.
The design will be ColorSorted (if desired) when it is exported for stitching. See Export.
You could change the thread colors for single letters in the monogram. See Varying the Colors for Specific Characters.
Change Lettering Fills: Camp Pine Diary
-
Ensure mySewnet™ Embroidery

is open.
-
In the File menu, click Configure, then click the Appearance tab.
-
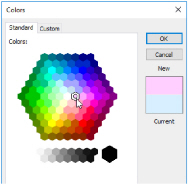
For Background, click the drop-down arrow and then click More Colors on the drop-down panel. The Colors dialog box appears, with the Standard tab selected.
-
In the hexagonal matrix, click the medium pink hexagon sixth from the right (just to the right of the central white hexagon). The color sample on the right will show the old and new colors.
-
Click OK. The new color is shown on the Color button.
-
Click Apply and the new color will be seen in mySewnet™ Embroidery. Click OK.
Alternatively, you could load a fabric using the Background Wizard. -
Click the View tab.
-
Click Change Hoop

and in the Hoop Selection dialog box select 240mm x 150mm - Universal Large Hoop 2, with Orientation set to Natural. Click OK.
-
Ensure that the Grid Size is set to 10mm.
-
Click File, Preferences

and ensure Check Spelling is selected and the language is set to English US.
-
Click the Back arrow at the top of the File menu, then click the Letter tab.
-
In the font gallery on the left, scroll to the Display font category.
-
Select the font Revue 2C UC 25-120mm SF. It will be shown as the selected font on the Letter page.
-
Click in the Letters box and enter the following text (press Enter as indicated, to create more than one line of lettering):
CAMP<Enter>
PINE<Enter>
DIARY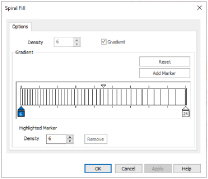
-
Leave Size at the 25mm default, ensure Lettering Shape is set to Horizontal Block

, that Individual is deselected (unchecked), and that ColorSort is selected (checked).
-
Click Apply

and the lettering will appear on the work area.
-
Right-click the lettering and select Spiral Fill from the right-click menu. The Spiral Fill Properties dialog box appears.
The Density settings are displayed. A Gradient Density of 6-24 is used. -
Click OK to close the dialog box.

-
Right-click the lettering again and select Satin Line from the right-click menu.
-
Ensure that the Density is 4, Width of the Satin Line is set to 2.0mm, and Underlay is selected. Click OK to close the dialog box.
You will adjust the colors of the lettering when all text has been created. -
In the font gallery on the left, ensure that the Display Category is selected, and select the font Revue 2C UC 25-120mm MF.
-
Click and drag in the Letters box to highlight the previously entered text, and enter the following text to replace it:
-
Set Size to 43mm.
-
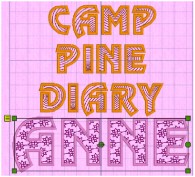
In the Stitch Type drop-down list, select Motif Fill. The Motif Fill properties dialog box appears, with the motif set to a heart.
-
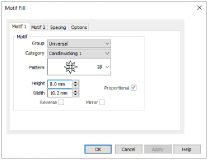
In the Motif 1 tab, set the Group to Universal and the Category to Candlewicking 1.
-
Click the drop-down arrow for Pattern, scroll down the list and select Pattern 18.
-
Ensure that Proportional is selected, and set the Height to 8.0mm.
-
Click the Spacing tab.
-
Ensure the Horizontal Gap is set to 15%, and set the Horizontal Offset to 50%.
-
Click the Options tab.
-
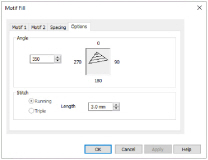
Ensure that the Angle is set to 350.
This will make the linking stitches between the flower motifs less noticeable than if set to 0. -
Click OK to close Motif Fill properties.
-
Ensure Lettering Shape is set to Horizontal Block

.
-
Click Apply

and the lettering will appear on the work area, below the CAMP PINE DIARY lettering, if that was selected.
-
Click the CAMP PINE DIARY lettering to select it, and move it up one and a half grid squares (15mm) to allow for a border.
-
Click the Frame tab, then click Border
 .
. -
Ensure that Margin is set to 6mm, that Rounded Corners is deselected (unchecked), and that Group is selected (checked).
-
In Border Options select Motif Line

.
-
In the Stitch Type

drop-down menu on the right, select Motif Line.
-
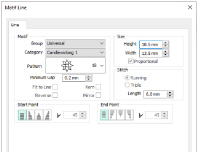
In the Motif Line Properties dialog box, set the Motif Group to Universal, and the Category to Candlewicking 1.
-
Click the drop-down arrow for Pattern, scroll down the list and select Pattern 18.
-
Set Minimum Gap to 0.2mm.
-
Ensure that Proportional is selected, and set the Height to 10.5mm. The Width will automatically be set to 13.5mm.
-
Ensure that stitch type is set to Running, and that stitch Length is set to 6.0mm.
-
Click OK to close the Motif Line Properties dialog box.
-
Click Apply

. A border will be placed around the lettering.
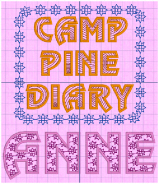
The border uses the same motif as the fill for the ANNE lettering. -
In the FilmStrip, click Reveal Groups

. Alternatively, choose Reveal Groups from the context menu
This will enable you to modify the Camp Pine text and border separately. -
Press the Tab key to select the Diary text, or select it in the FilmStrip.
-
In the Design Panel move the arrow pointer over the brown color in the color worksheet (Robison-Anton Rayon 40, 2334 Terra Cotta) and pause for a moment. The areas of brown thread in the embroidery are highlighted, and a popup description of the thread is displayed.
This is the thread for the Spiral Fill. -
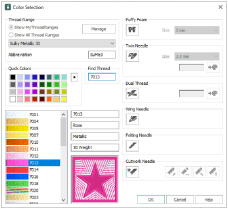
Double-click the thread to open the Color Selection dialog box, and set the thread range to Sulky Metallic 30 in the drop-down list.
-
Then select thread 7013 (Rose) and click OK to close the box. The Spiral Fill thread is now metallic.
-
In the color worksheet, double-click the orange thread (Robison-Anton Rayon 40, 2327 Honeydew).
This is the thread for the satin border around each letter. -
In the Color Selection dialog box, select Sulky Rayon 40 from the Thread Range drop-down list.
-
Click in the Find Thread box and enter '1011'. Thread color 1011 (Steel Gray) will be found in the list. Click OK to change the color.
-
Click the border in the FilmStrip.
-
In the color worksheet, double-click the blue color (Robison-Anton Rayon 40, 2527 Soldier Blue). This is the thread for the motif border around the lettering.
-
In the Color Selection dialog box change this color to Sulky Rayon 40, thread color 1109 (Hot Pink).
-
Click Reveal Groups

to deselect it.
-
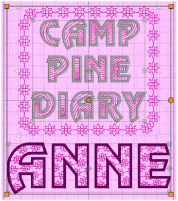
Click the ANNE lettering. A box with green handles surrounds the text.
-
In the color worksheet in the Design Panel, double-click color 1 (the motif fill).
-
In the Color Selection dialog box, select Sulky Rayon 40 from the Thread Range drop-down list and change the color to thread color 1109 (Hot Pink).
-
In the color worksheet, double-click color 2 (the satin border around each letter) and in the Color Selection dialog box, change the color to Sulky Rayon 40, thread color 1192 (Fuchsia).
-
Adjust the texts until you are happy with the result.
-
In the Home tab, click Select All

.
-
In the Alignment drop-down list, click Horizontal Alignment, Align Center

. The embroideries are aligned along the same vertical line.
-
Click Center in Hoop

.
-
Click Group

.
-
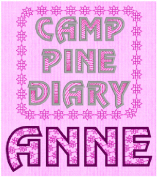
In the Quick Access toolbar, click Life View

. View the embroidery as it will be exported, then click Cancel.
-
Click Save

and the Save As dialog box will appear.
-
In the Save In box, browse to the folder \mySewnet\MyDesigns.
-
In the File Name box, change the name to 'Camp Pine Diary', then click Save. A .vp4 extension is added automatically.
This will save the title and year lettering separately, making further adjustment easy. -
Click Export

in the Quick Access toolbar to export the embroidery optimized for stitching.
-
In the Export dialog box, ensure that .vp3 is selected, and in the Save As dialog box, save the embroidery as \mySewnet\My Designs\Camp Pine DiaryExported.
-
Click File, Print to see the Print Preview.
-
In Worksheets, ensure that Design Scale is set to 75% and that Grid and all the Print Information boxes are checked.
With these settings the design and color guide will be on one page, but the printout will not be used as a placement template.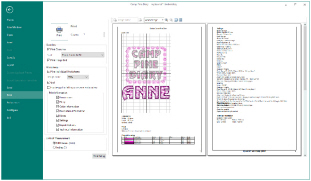
-
In the Multiple Pages

drop-down list, select two pages. You can now view the design and the rest of the worksheet.
Note that settings information for the lettering has been added automatically. -
Click Print to print the worksheet.
Font names include information in addition to the name of the lettering style. 2C means that the font uses two colors. UC indicates the font has only uppercase characters (LC would indicate lowercase characters).
Following the font type is the recommended size range. For instance, 25-120mm indicates the font is recommended for use at sizes from 25mm to 120mm. A stitch type abbreviation may be present at the end of the name, in this case SF for Spiral Fill.
The MF suffix indicates that this font uses a Motif Fill.
ANNE

When using Motif Fill fonts, you may choose from hundreds of motifs, including those similar to your own embroidery machine stitches.
The Width will automatically be set to 10.2mm.
|
|
This will enable you to keep the project elements together, but modify the lettering again in future. For example, you could use Reveal Groups and edit the text to change ANNE to JANE.
After completing this exercise, you can use the Appearance tab of mySewnet™ Configure to set the Background Color back to the default blue (RGB 211, 233, 255) in the Colors dialog box Custom tab.