Use Import Font From Embroideries  to import individual embroidered letters to create a font. Browse to the letters individually, or drag them from an Explorer window.
For best results, remove any stray stitches in mySewnet™ Stitch Editor before importing the letters.
As the imported letters are stitch files, rather than fully adjustable design files, they work best at their original size, with the minimum of reshaping.
Imported fonts work best with the Line, Vertical Block and Horizontal Block lettering shapes.
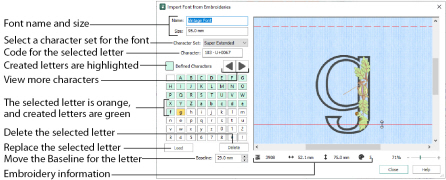
Name
The name that the font was given in the Select a Name dialog box is displayed.
This name is unique. An error message is displayed if an existing name is used.
Size
The size of the font. This is taken from the size of the Upper Case ’A’, which is the first letter in the font to be created.
Character Set
Choose a character set for the font. The available options are: Extended, Super Extended, Latin 1, Western 1, Western 2, Western 3, Western 4, Cyrillic 1, Cyrillic 2, Cyrillic 3, Hiragana 1, Hiragana2, Greek 1 and Hebrew 1. The default character set is Extended.
For more information on character sets, see Select Font.
Character
The ASCII character code for the selected letter is given.
Defined Characters
The letters that have already been created are highlighted in green, and the selected letter is highlighted in orange. Click the Previous
and Next
buttons to view more letters (for example Lower Case letters).
Click to select a letter to create, replace or delete in the letter panel.
Use the Page Up and Page Down keys on the keyboard to move between the letters.
Load
Click Load to reload the selected character. Use Load to replace the current character with a different embroidery. For example, reload if an incorrect character was selected, or to reload the embroidery at its original settings.
Delete
Click Delete to remove the selected character from the letter panel. Use Delete if a character was created in error, such as if a Lower Case letter was added to an Upper Case font.
Baseline
Enter a number for the Baseline of the selected character, or use the up and down arrows to adjust the positioning of the character on the Baseline.
You can also drag the solid red Baseline to position the character.
Adjust the Baseline for descender characters like Lower Case g, p, and y, or where a decoration on the character descends below the natural Baseline for the character.
A dashed top red line indicates the position of the top of the Upper Case A. Use this when adjusting the postion of letters and punctuation symbols.
Design Information
The Design Information shows the stitch count

, dimensions (Width

and Height

),and number of colors

for the character embroidery.
Zoom Bar
Use the Zoom Bar at the bottom of the screen to zoom in or out from the center of the embroidered letter.

Use the slider to zoom in or out, or click on the Zoom Out

or Zoom In

icons.