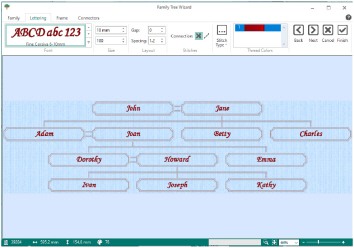
Use the Lettering page to select the style for the text in the family tree. Choose the font, size, color, spacing and stitch type options for the names.

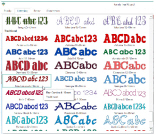
Lettering is created from the fonts available in the mySewnet™ Embroidery Software. Set lettering styles in the Lettering page of the Family Tree Wizard. Font means lettering style. The current font is shown in the Font gallery.
As the lettering is changed, the preview below reflects the changes made.

Change the Appearance of Lettering
Follow these steps to change the appearance of the lettering in a family tree:
-
Click the arrow to the right of the font drop-down menu and the font gallery appears.

-
Scroll up or down to select a font from one of the 18 themed font categories.
Alternatively, use the up and down arrows on the Font section of the Lettering page to see fonts one at a time.
The font name specifies the recommended size range for each font. For example, Rian 10-30mm has a recommended size range of 10mm to 30mm. Font names with UC are uppercase only fonts (that is, they have no lowercase characters), and with LC are lowercase only. -
Set the font Size

in millimeters or inches as desired, from 3mm to 200mm.
-
If desired, change the proportions of the lettering in the percentage Width

box. Change the width from one quarter to four times the default setting.
-
If desired, change the Gap from -99 to 99. Negative values move characters closer together, and positive values move them farther apart.
-
To change the distance between multiple lines of text, adjust Spacing from 1.0 to 5.0.
-
To choose the connection method, click Trim

(joined by movement stitches that are automatically trimmed by compatible machines) or Running Stitch

(joined with small stitches), as desired.
-
Select a line or fill type from the Stitch Type drop-down list. The properties dialog box for the stitch type will appear.
-
Use the properties dialog box to change the lettering properties, for example the density, and the stitch length, angle and pattern.
-
Set the Thread Color to use when embroidering the text. Click one of the thread color blocks to open the Color Selection dialog box.
This sets the height of the 'A' character in the font. All other characters and symbols are sized relative to the height of 'A'. The size is initially set to the minimum recommended size for the chosen font.
Fonts appear best when using the recommended size range.
Lowercase characters in Script fonts are not affected by the Gap setting.
Spacing is relative to the height of the ’A’ character. The default spacing is 1.2.
Trim is recommended for most fonts. Running Stitch is recommended for very small text using Nearest Point fonts.
Change Letter Properties and Color
If the Stitch Type area is grayed out (unavailable), this means that the font was designed with properties that cannot be edited. This is usually because the properties are not the same throughout the font. For instance, different letters may use different fill patterns.
For example, in the Modern category, Bremen UC 10 -25mm has Satin Column stitches, therefore the Satin Column drop-down is available. Bremen UC 15-60mm has Pattern Fill stitches, therefore the Pattern Fill option is available. In the Monogram category, Athletic Square 2C UC 30-80mm has both Satin Column and Pattern Fill stitches, therefore both options are available. In the Floral category Acorn 6C UC 35-60mm uses more than one type of Pattern Fill. Therefore the Stitch Type area is unavailable.
Scroll down to see the other font colors.
Back
Go to the Family page.
Alternatively, click the Family tab.
Next
Go to the Frame page.
Accept the final family tree and close the Family Tree Wizard.
Cancel
Close the Family Tree Wizard without creating a family tree.