Use the Select a Name dialog box to give your imported font a name.

An error message is displayed if the name has already been used.
Name the font, then click OK to select the letter ’A’ for the font in the Open dialog box.
Create a Font from Embroidered Letters
-
Place your embroidered letters in a folder on your computer.
-
In the Letter tab, click Font Manager
 . The Font Manager dialog box opens.
-
Click Import Font from Embroideries
 . A dialog box opens for you to name your font.
 -
Enter a name for your font, and click OK.
The font naming dialog box closes and an Open dialog box appears.
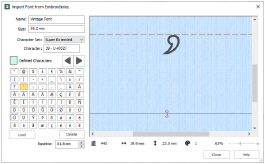
The font illustrated here is Vintage Floral Monogram from the mySewnet™ Library. -
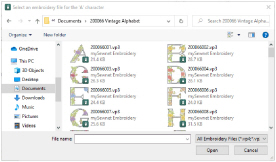
In the Open dialog box, browse to the folder with your embroidered letters.
The Tiles option in the Open dialog box is useful when selecting letters. -
Select the Upper Case letter ’A’, then click Open. The Import Font from Embroideries dialog box opens with the letter ’A’ selected.
-
In the Letter panel on the left, click the letter ’B’. The Open dialog box opens for you to load the letter ’B’.
-
Click to select the letter ’B’, then click Open to load it in the Import Font from Embroideries dialog box.
-
Click to select the letter ’C’ and load it.
-
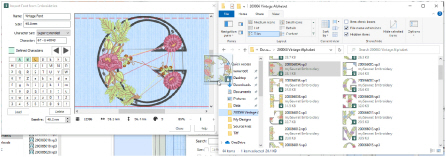
Without closing Import Font from Embroideries, open a File Explorer window and browse to the letters for your font.
-
In the File Explorer window, click the letter ’D’ and drag it to tile D in the Import Font from Embroideries dialog box.
-
Click to select the letter ’G’, and drag it to the E tile.
The letter ’E’ is highlighted, but the letter ’G’ is in the preview. -
Click and drag ’E’ to place it in the correct position.
-
Click and drag to load the other upper case letters in your alphabet, then load the lower case letters up to the letter ’f’.
-
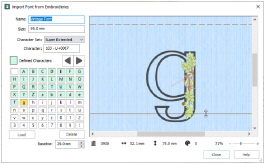
Click and drag the small ’g’ onto its tile.
-
The solid red line across the preview is the Baseline for the selected letter. Click and drag the Baseline upwards so that the body of the ’g’ rests on it, and the tail hangs below. The line moves up across the letter.
You can also use the up and down arrows by the Baseline number box to adjust the Baseline, or enter a number.
The Baseline sets where the letter will be placed along the line relative to the other letters in the font. -
In the Import Font from Embroideries dialog box, click Next

to view more letters.
-
Click and drag the apostrophe onto its tile.
You can use the comma for an apostrophe. -
Click and drag the Baseline downwards to place the apostrophe just below the dashed line at the top.
You may need to zoom out using the slider to adjust the position of the lines. -
Load the remaining embroideries for the font, and adjust the Baseline for the letters.
-
Click Close when you have finished, and also close the Font Manager.
If you need to take a break, click Close to save the font, and Font Manager, then browse to it in the My Fonts Category to load it again with the Edit Imported Font button. -
Select your new font in the Letter tab.
-
In the Letters text box, enter a series of letters to view their position relative to the Baseline, for example "abcdefghijklm".
-
In Shape, select Fit to Straight Line
 , then click Apply.
 -
If needed, adjust the hoop size and orientation so that your lettering will fit across the bottom of the hoop.
For larger letters, use a custom hoop size. -
Drag the green handle on the right up or down so that the lettering lies horizontally along one of the grid lines.
-
Open the Font Manager
 .
. -
Drag the dialog box up towards the top of the screen.
-
Ensure that your imported font is selected, and click Edit Imported Font.
-
Move the Import Font from Embroideries dialog box upwards so that you can see your line of lettering.
-
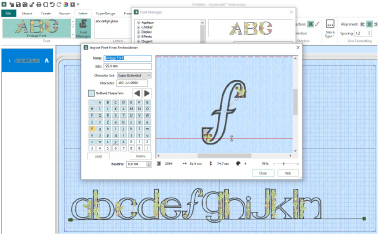
Select a letter that needs adjusting. In this example I will adjust ’f’.
-
Click and drag the solid red Baseline below the ’f’ upwards so that the bottom of the ’f’ will be below the Baseline.
-
Release the mouse button. The letter ’f’ in the text below the dialog box moves downwards.
-
Adjust the Baseline again so that the letter ’f’ is aligned correctly with the other letters.
-
Select the small letter ’j’.
-
Adjust the ’j’, then adjust any other letters in that line.
-
Adjust the other letters in your alphabet.
-
When you have adjusted all of your letters, click Close to save your font, and then in Font Manager click Close again.

-
Use your new font in the Letter tab.
To fine tune the placing of your letters in the work area, use the Individual option. You can adjust the colors of an imported font in mySewnet™ Font Digitizing.
Imported fonts work best with the Line, Vertical Block and Horizontal Block lettering shapes.
As the imported letters are stitch files, rather than fully adjustable design files, they work best at or near to their original size, with the minimum of reshaping.
Note the red baseline under the letter ’A’. The Baseline sets where the letter will be placed along the line relative to the other letters in the font.

When using Import Font from Embroideries to create a font from individual embroideries, the Upper Case ’A’ is always created first. The size of the letters in the font is taken from the letter ’A’.
Note the red dashed line above the ’B’. This line indicates the position of the top of the letter ’A’.
You can also use Load and Delete to replace and remove unwanted letters.
Adjust your Imported Font
Either click on the ’j’, or use the Page Up and Page Down keys on the keyboard to move through the letters in the dialog box.

If you want to start again with a particular letter, click Load and reload the embroidery.
Many Upper Case fonts will need little Baseline adjustment.
Lower Case letters are likely to need more adjustment, particularly letters like p, g, and y with descenders.