How to Create Lines with Point Create
Outline the Fleur de Lys With a Satin Line
-
Click File, New
 or File, New Window
  and in the Choose Design Type page of the ExpressDesign Wizard select Load Existing Design, then click Next. In the Open Existing design page, click Load a Design
  , browse to the folder Documents\mySewnet\Samples\Digitizing\Edo, and load the file 'Fleur de lys with bars’. Click Finish.
Alternatively, use the design from Create the Band and Feathers for a Fleur de Lys. -
Click the Point Create tab.
-
Ensure that Fill and Appliqué are not selected (not highlighted).
-
Click Create Area or Line
 to select it. The Create Cursor appears
  .
. -
Note the position of the Create Cursor
 . This marks the end of the last object in the design.
 -
Ensure that Line is selected, and in the Line drop-down list select Running Stitch
 .
. -
Move the pointer towards the Create Cursor, until it changes to the diagonal pointer
 and click to place a point over the Create Cursor.
 -
Place a second point to draw a straight line to the left side of the base of the left feather.
-
In the Line drop-down menu, select Satin Line
 .
. -
Placing the first point on top of the Create Cursor
 , place points to draw a line around the left feather to the base on the right. Use Ctrl to place square points at the tip.
 -
Right-click twice to finish the line, and to deselect Create Point Area or Line.
-
Right-click the satin line to open the Fill Area and Line dialog box.
-
Ensure that Density is set to 4 and that Underlay is selected (checked). Set Width to 2.5mm.
-
Click the Favorites tab. Click ’Set these options as the current settings’
 . Then click OK to close Fill Area and Line dialog box.
 -
In the Line drop-down menu select Running Stitch
 .
. -
Use Create Point Area or Line
 to create a straight line from the Create Cursor to the left side of the base of the middle feather, and right-click to finish the line.
 -
In the Line drop-down menu, select Satin Line
 .
. -
Create Point Area or Line
 is still selected. Draw a line around the middle feather from the Create Cursor
  to the base on the right. Use Ctrl to place square points at the tip.
Place roughly the same number of points on similar curves so that the feather borders have the same appearance.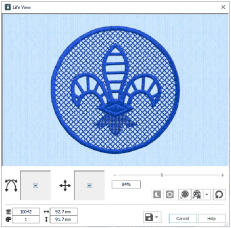
-
Right-click to finish the line.
-
In the Line drop-down menu select Running Stitch
 and then use Create Point Area or Line to create a straight line from the Create Cursor to the left side of the base of the right feather.
 -
In the Line drop-down menu, select Satin Line
 . Then use Create Point Area or Line to draw a line around the right feather from the Create Cursor
  to the base on the right. Use Ctrl to place square points at the tip.
 -
Right-click to finish the line.
-
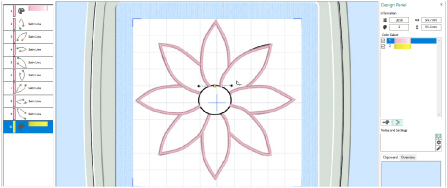
Click Life View
 to see the border around the feathers. Click Cancel.
 -
In the Line drop-down menu select Running Stitch
 . Starting at the Create Cursor, use Create Point Area or Line
  to create angled lines around the right side of the band and down to the base of the fleur de lys.
 -
Right-click to finish the line.
-
In the Line area, select Satin Line
 . Then use Create Point Area or Line
  to draw a line around the base of the fleur de lys.
Use Ctrl to place square points where the base joins the band, and at the tips and angles of the base. -
Click to place a square point where the base of the fleur de lys meets the band on the left.
-
Click to place a square point at each corner of the band, finishing back where you started at the left side of the base of the fleur de lys.
-
Right-click twice to finish the line, and to deselect Create Point Area or Line.
-
Click Life View
 to see the border around the complete fleur de lys. Click Cancel.
-
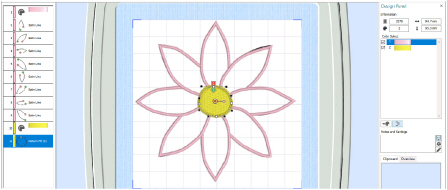
In the FilmStrip, scroll up to the top. This takes you to the start of the design.
-
Select the Satin Line circle. This should be object number 3 in the FilmStrip.
-
Click Move to Front of Design
 .
.
The circular satin line will be placed at the front of the design (the bottom of the FilmStrip), below the satin line for the base of the fleur de lys. It will be stitched out last. -
In the FilmStrip, scroll up to the top.
-
Select the blue thread color in position 1.
-
Right-click the thread and select Properties. The Color Selection dialog box opens.
-
Ensure that the thread range is set to Robison-Anton Rayon 40, and enter 2232 in the Find Thread box. Thread 2232 (Ecru) will be selected. Click OK.
-
In the Design Panel, click the Edit
 button next to the Notes box.
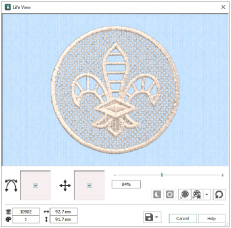
-
In the Notes dialog box use the quick keyword selector to add the keyword ’Heirloom’. Click the plus sign next to the heading to see more options and add the keywords ’Free Standing Lace’ and ’Cutwork Richelieu’ from the list. Then click OK.
-
Click Life View
 to view the finished design. Click Cancel.
 -
Click Save
 and browse to Documents\mySewnet\My Designs.
 -
Set the file name to 'Fleur de Lys' and click Save.
-
Click Export
 , and set the file format to .vp4, then click OK.
The preferred file format for saving embroideries is .vp4 format as this will preserve the separate parts of multipart designs. It also preserves thread color information and notes. -
In the Save As dialog box, browse to Documents\mySewnet\My Designs and export the embroidery as Fleur de Lys_Exported.
-
Click Print
 to print the embroidery worksheet.
If it is not on the left side of the base of the left feather, follow steps 6 to 9. Otherwise see step 10.
If desired, use 2D and zoom in to see more clearly.
When you next use Satin Line, the settings that you have just set up for satin line will be used. This is an alternative way to set the Options.
A satin line is not placed along the side of the band as the whole of the band will be outlined in satin later.
For free-standing lace, embroider your design on heavy-weight water-soluble stabilizer. When finished, rinse the embroidery in lukewarm water to remove the stabilizer. Let dry and press the lace flat.
Alternatively, embroider the design with cutwork for the fleur de lys feathers. Hoop up with linen fabric and water-soluble stabilizer underneath. When you embroider the design, trim out the cutwork areas.
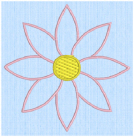
Draw a Flower using Bezier Curves
-
Open mySewnet™ Digitizing and in the Choose Design Type page of the ExpressDesign Wizard, select Load or Create a Background Picture. Click Next.
-
In the Choose Picture Window, click Load a Picture
 , browse to the folder Documents\mySewnet\Samples\Digitizing\Pics, and load the file 'Motif Flower.png’. Click Next.
 -
In the Rotate and Crop Picture page, click Select All, then click Next.
-
In the Design Size page, select Enter Design Size, click Change Hoop, and set the hoop to Universal, 100mm x 100mm - Universal Square Hoop 1. click Next.
-
In the Reduce Colors page, click Finish.
-
Click the View tab, and ensure that Grid size is set to 10mm.
-
In the FilmStrip, right-click the color block and select Properties from the Context menu.
-
in the Color Selection dialog box, click the pink in the Quick Colors (the second color in the bottom row) and then click OK.
-
Click the Point Create tab.
-
Ensure that Fill and Appliqué are not selected (not highlighted).
-
Set the Line Type to Satin Line
 .
. -
Click Fill Area and Line
 to open the properties dialog box.
 -
Set the Line width to 1.5mm, then click OK.
-
Click Bezier Mode
 to select (highlight) it.
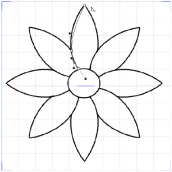
-
Click Create Area or Line
 to select it. The Bezier Mode pointer appears
  .
.
See Draw a Circle in Bezier Mode for the essentials of drawing Bezier lines. -
At the left side of the base of the petal at the top, click and drag up and slightly to the left, then release the mouse button.
-
Starting where the petal to the left meets the petal you are drawing, click and drag upwards a short distance to where the next set of grid lines cross.
-
Click (without dragging) to place a point at the tip of the petal. This is a Corner point.
-
Move the pointer over the second square white point. The pointer changes to the Move pointer
 .
. -
Drag the point a short distance up and to the left, along the outline of the petal until the curved line underneath fits the outline of the drawing.
-
Click and drag downwards a short distance from the mid point of the right side of the petal.
-
Click to place a single point where the the line touches the next petal.
As you become more skilled, try clicking and dragging to place a curved line using a single point at the base of the petal. -
Right-click to place the line.
The curve of the line will probably need some adjustment, but this is better done later, after you have placed lines for the other petals. -
At the left side of the base of the petal to the right of the one that you just drew, click and drag upwards a short distance, then release the mouse button.
-
Starting where the petal to the left meets the petal you are drawing, click and drag diagonally towards the top right corner of the hoop.
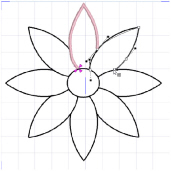
-
Release the mouse button when you reach the grid line above.
-
Click (without dragging) to place a point at the tip of the petal.
-
From the mid point of the right side of the petal, click and drag diagonally towards the bottom left corner of the hoop.
-
Click to place a single point where the the line touches the next petal.
-
Use the Move pointer to adjust the position of the white squares so that the curved line fits the picture behind.
You can further adjust the Bezier line using the black handles. -
Right-click to place the line.
-
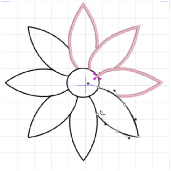
Starting at the bottom left of the third petal, click and drag a short distance diagonally to the right to place the first point.
-
Where the outline of the petal meets the grid, click and drag a horizontal line a short distance to the right to place the next part of the curve.
-
Click to place a point at the tip of the petal.
-
Mid way down the other side of the petal, click and drag to the left and slightly down to place the next point.
-
At the base of the petal, click to place a final point, then right-click to place the line.
-
Place Bezier curve lines to draw the other petals, finishing at the petal to the left of where you started.
If you move the black handle to the left or right as you draw, you can place the curve to follow the outline, often with no need for later editing. -
In the ribbon bar, click Add Color Change
 .
. -
Click the yellow at the bottom right corner of the Quick Colors, then click OK to select the yellow thread.
-
Set the Fill Type to Pattern Fill
 (it will be highlighted).
 -
Starting at the top of the center of the flower, click and drag a short distance to the right, then release the mouse button.
-
Click and drag vertical and horizontal lines of similar lengths to place the other three points creating the circle.
-
Right-click to place the center of the flower.
-
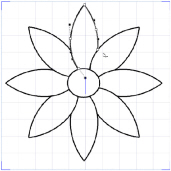
Click the Home tab, then click Edit Points
 . The points you drew for the center of the flower can be seen.
 -
In the FilmStrip, click on each petal in turn, and make a note of the ones you will need to adjust.
-
Click the View tab.
-
Click Object View
 , to see the outline of the Bezier lines clearly.
 -
Drag the Background slider to fade the background so that the Bezier lines can be seen over the original picture.
-
Adjust the handles on the points to make the Bezier line follow the background.
If the handles from two different points overlap, move both nearer to their own point, to smooth the curve. -
Switch between Object View
 and 3D View
  to check the effect of your changes on the Satin Line.
For more information on editing, see Edit a Bezier Line. -
When you have made your changes on one petal, select the next petal in the FilmStrip and adjust that one.
If you find that one of corner points actually has very short handles, either use Convert to Corner in the Home tab to change it to a corner, or drag the handles sufficiently close to their point that they vanish.
 -
Save your flower. You can adjust it further when you open the file again.