Place a Border of Buds for the Happy House Sampler
-
In mySewnet™ Cross Stitcher
 , start the Cross Stitch Design Wizard and select Start a New Cross Stitch Design with no Picture. then click Next.
 -
In the Design Size page set the Cross Size to 1.8mm.
-
Set Width (Crosses) to 63, and set Height (Crosses) to 66. Then click Finish.
-
In the Home tab of the ribbon bar, click Design Properties.
-
In the Design Properties dialog box, ensure that in Thread Count both Crosses and Backstitch are set to Single (2 Threads). Click OK.
-
In the View tab, ensure that Grid is set to Every 10 Lines
 .
. -
Click the Insert icon
 and the Open dialog box will appear.
 -
Click the small flower called 'Bud 2.krz'.
-
Click Open to load the design.
-
Notice the flower is selected with Box Select. On the selection box, click the Flip Vertical
 and Flip Horizontal
  handles to turn the design the opposite way around.
 -
Click and drag Bud 2 to position it one square from the left edge and one square down from the top edge.
-
In the Home tab, click Copy
 .
. -
Click Paste
 , then click and drag the new copy of Bud 2 to the right so that it joins onto the first one.
 -
Paste four more copies of Bud 2 and join them in a line across the top of the design area.
-
Click outside the last bud to deselect it and set it in place.
If the folder shown in the Viewer is not Documents\mySewnet\Samples\Cross Stitch\Krz, browse to this folder.

To add some text, see Create Text for the Happy House Sampler.
Add Designs to the Happy House Sampler
-
In mySewnet™ Cross Stitcher

, select File, New

to start the Cross Stitch Design Wizard, select Load Existing Cross Stitch Design, and click Next. in the Open Existing Design page click Load a Design

and load Documents\mySewnet\Samples\Cross Stitch\Krz\HappyHouseBudsText.krz.
-
In Design Properties on the Home tab ensure that Thread Count, Crosses and Backstitch are set to Single (2 Threads), and in the View tab ensure that the Grid is on.
-
In the Quick Access toolbar, click Insert

.
-
In the Open dialog box browse to Documents\mySewnet\Samples\Cross Stitch\Krz\Farmer Man.krz, then click Open. The design will be displayed on the screen and it will be selected with Box Select.
-
Click and drag inside the selection area to position the farmer on the left of the design, so that he is one grid square inside the left edge of the design area and the top of his hat is level with the ’H’ in House.
-
Click Insert

and in the Open dialog box load 'Farmer Woman.krz'. The design will be displayed on the screen and it will be selected with Box Select.
-
Click and drag inside the selection area to position the farmer on the right of the design, so that her arm and boot to the right are below the right end of the line of buds, and her feet are level with her husband’s.
-
Click Insert

and in the Open dialog box load 'Small House.krz'. The design will be displayed on the screen and it will be selected with Box Select.
Alternatively, browse to Documents\mySewnet\My Designs\ and select the copy of 'Small House.krz'. that you created in Draw a House with Stitches.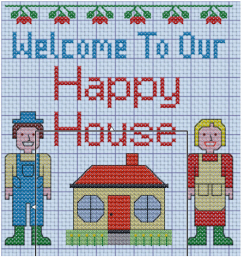
-
Position the house so that it is between the two farmers, and level with their feet.
-
Click outside the selection to deselect it and set it in place.
-
Click Insert

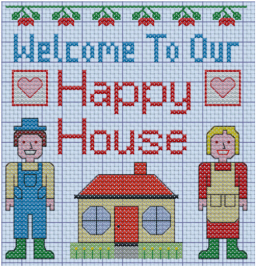
and load Documents\mySewnet\Samples\Cross Stitch\Krz \Boxed Heart.krz. The design will be displayed on the screen and it will be selected with Box Select.
Notice that the box around the heart is made of Half Width and Half Height Crosses to create a narrow border of crosses. -
Click and drag inside the selection area to position the boxed heart over the farmer’s head, level with the top of 'Happy'.
-
Click Copy

.
-
Click the Paste

icon, then click and drag the new copy of the boxed heart to position it over the other farmer’s head, level with the top of 'Happy'.
-
Click outside the selection to deselect it and set it in place.
Alternatively, set up the work area and create the sampler text as described in Create Text for the Happy House Sampler.
To remove unused threads, see Remove Unused Colors From the Happy House Cross Stitch.