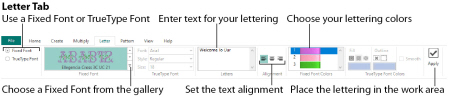
Select Fixed Font on the Letter tab of the ribbon bar to place text using pre-defined fonts. Fixed Text is applied according to the design of the characters, which can include any type of stitch.
Create Fixed Text Lettering
-
Click the Letter tab in the ribbon bar.
-
On the left of the Letter tab, click Fixed Font.
-
Enter the desired text in the Letters box. Press Enter for extra lines of text.
-
To choose a font, click the drop-down arrow to the right of the font display and select a category and font from the gallery.
The font names include additional information to the actual name of the lettering style. 2C and 3C indicate the font uses two or three colors. UC indicates the font has only uppercase characters. LC indicates the font has only lowercase characters. At the end of the font name is the font size, which is the height of the 'A' character in grid squares. For instance, Sans Cross 3C 7 uses three colors and the 'A' is seven grid squares high. -
If there is more than one line of text, choose Left
 , Center
  or Right
  Alignment.
 -
To use colors different from the default colors, click a thread sample in Fixed Font Colors, and the Color Selection dialog box appears. Choose a new color and click OK.
If colors are used that are not in the palette, they are automatically added to the palette when the text is fixed in the design. -
Click Apply. The text will appear on the design in a selection box.
-
Click and drag inside the selection box to move the text to the desired position.
-
If desired, change the text or any text options and click Apply again to create a new version of the text.
-
Click outside the selection box to set the text in place.
You must do this for each section of text if you are placing several sections of text.
Fill patterns are not used by Fixed Fonts when the text is applied. However, the characters may be flood filled with any pattern using Pattern Flood Fill  after they have been fixed in place.
Click the drop-down arrow and choose any Fixed Font installed on your computer for mySewnet™ Cross Stitcher from the gallery. Scroll through the list of fonts by Category, and click a font sample to select it.
The font names include information in addition to the actual name of the lettering style. 2C and 3C indicate the font uses two or three colors. UC indicates the font has only uppercase characters. LC indicates the font has only lowercase characters. At the end of the font name is the font size, which is the height of the 'A' character in grid squares. For instance, Sans Cross 3C 7 uses three colors and the 'A' is seven grid squares high.
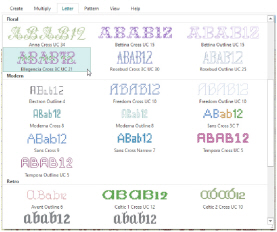
There are 7 themed font categories:
|
Display |
Decorative fonts. |
|
Elegant |
Stylish fonts with a heritage feeling, such as gothic alphabets. |
|
Floral |
Fonts with leaves and flowers decorating the letters. |
|
Modern |
Fonts with 'clean' designs in modern styles. |
|
Retro |
Celticf and other classic style fonts. |
|
Script |
Fonts with an appearance of handwriting. |
|
Traditional |
Old-fashioned serif fonts. |
If multiple lines of text have been entered, use the Alignment to change how the lines are placed relative to each other. Choose Left

, Center

or Right

alignment.
Click in the Letters box and enter the desired text. Press Enter to start a new line of text.
Click Apply

and the text will appear on the design in a selection box, and Box Select is automatically activated. Click and drag inside the selection box to move the text to the desired position. The text is not fixed in place until you click outside the selection box.
Fixed Fonts can have up to three colors in them. Click the desired color and the Color Selection dialog box appears, so you can choose a new color. When a new color is chosen, all stitches in the current font that use the color will be affected. The colors are reset when the font is selected again.
Fill patterns do not affect Fixed Fonts.
Create Text for the Happy House Sampler
-
In the Home tab, click Design Properties and in the Design Properties dialog box, ensure that Thread Count, Crosses and Backstitch are set to Single (2 Threads). Click OK.
-
In the View tab, ensure that Grid is set to Every 10 Lines
 .
. -
In the File menu, click New
 or Open
  and load Documents\mySewnet\Samples\Cross Stitch\Krz\Line of buds for Happy House.krz.
Alternatively, set up the work area and create the line of buds as described in Place a Border of Buds for the Happy House Sampler. -
Click the Letter tab.
-
At the left end of the Letter tab, click Fixed Font.
-
In the Fixed Font area, click the drop-down arrow to view the font gallery.
-
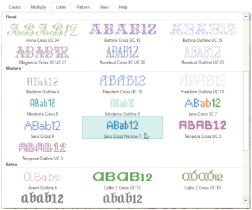
Click and drag the scroll bar on the right of the box down to the Modern font category.
The Fixed Font names include the type of stitches in the font, and the number at the end is the height in grid squares of the 'A' character in the font. Additionally, fonts that use more than one color will have 2C (two color) or 3C (three color) in the name. -
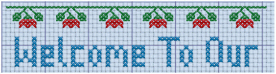
Click the font 'Sans Cross Narrow 7'. The gallery closes.
-
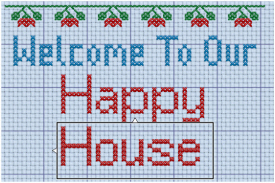
Click in the Letters box and type 'Welcome To Our'.
-
Click Apply. The text will appear on the design and it is automatically selected with Box Select.
-
Click and drag the selection so that the text is centered under the top border of buds, with the tops of the uppercase letters two grid squares below the buds. The left side of the W should be three squares from the left edge. The selection box will overlap the buds, but the buds will not be affected.
-
Click outside the selection box to deselect the text and set it in place.
-
In the drop-down list of fonts, select 'Sans Cross 9'.
-
In the Letters box, delete the previous text, type 'Happy', press Enter, then type 'House' so that the text is on two lines.
-
In the Fixed Font Colors box, click the blue color block and the Color Selection dialog box appears.
-
Ensure that Robison-Anton Rayon 40 is selected as the Thread Range. In the Find Thread text box, enter 2378 and the list will jump to 2378 (Red). Click OK and the color block will change to red.
-
Click Apply and the text will appear on the design, and it is automatically selected with Box Select.
-
Click and drag the selection to position the text centrally, with a gap of two grid squares under the 'Welcome To Our' line. Click outside the selection box to set the text in place.
-
The Box Select
 function is still selected, so click and drag a selection box around the word 'House'.
 -
Move the word 'House' exactly four squares up from its current position, so that the top of the 'H' is only one square below the 'y' of 'Happy'.
-
Click outside the text to deselect it and set it in place.
This changes the color of the lettering from the blue used by the font to red.
To add cross stitch designs to this sampler, see Add Designs to the Happy House Sampler.