Use Remove Unused Colors ![]() to delete any thread colors that do not have stitches in the design. This is useful, for example, if you have a lot of similar shades in the palette and you wish to ensure you continue to use only those colors that have already been used.
to delete any thread colors that do not have stitches in the design. This is useful, for example, if you have a lot of similar shades in the palette and you wish to ensure you continue to use only those colors that have already been used.
Unused colors are ignored by the print function, Design Player and Life View. Therefore, it is not vital to remove unused colors before using these functions.
Shortcuts
-
Home Tab:

-
Keys: Alt, H, U
Remove Unused Colors From the Happy House Cross Stitch
-
In mySewnet™ Cross Stitcher

, select File, New

to start the Cross Stitch Design Wizard, select Load Existing Cross Stitch Design, and click Next. in the Open Existing Design page click Load a Design

and load Documents\mySewnet\Samples\Cross Stitch\Krz\Happy House Extra Colors.krz. Click OK, then click Finish.
-
In the Home tab, click Remove Unused Colors
 . The initial thread color is removed, and the color list is reduced to the colors used in the design.
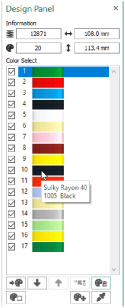
-
Look at the Color Select area in the Design Panel, and move the mouse pointer over the threads.
Notice that there are some Sulky Rayon 40 colors from the inserted Small House design that are similar to Robison-Anton Rayon 40 colors used in the rest of the design. To make the design stitch out more efficiently, some of the similar colors can be replaced. -
In the color list, click Sulky Rayon 40 1005 Black (number 10 in the list), then click Change Color
 . The Color Selection dialog box appears.
 -
In the Thread Range drop-down menu, choose Robison-Anton Rayon 40. The color changes to Robison-Anton Rayon 40 2296 Black. Click OK.
-
In the color list, click Sulky Rayon 40 1066 Primrose (number 13 in the list), then click Change Color
 . The Color Selection dialog box appears.
 -
In the Thread Range drop-down menu, choose Robison-Anton Rayon 40. The color changes to Robison-Anton Rayon 40 2461 Wheat. Click OK.
-
Click Sulky Rayon 40 1187 Mimosa Yellow (number 16 in the list), then click Move Color Down
 until it is below Sulky Rayon 40 569 Garden Green.
This is to ensure that the French knots that make the yellow flower heads in the house garden are stitched after the green backstitch stalks. -
Click Sulky Rayon 40 1187 Mimosa Yellow (now number 17 in the list), then click Change Color
 . In the Color Selection dialog box, select Robison-Anton Rayon 40 as the Thread Range, and then enter 2326 in the Find Thread box (Robison-Anton Rayon 40 2326 Daffodil). Click OK.
 -
Click Sulky Rayon 40 1246 Orange Flame (number 11 in the list), then click Change Color
 . In the Color Selection dialog box, select Robison-Anton Rayon 40 as the Thread Range, and then enter 2378 in the Find Thread box (Robison-Anton Rayon 40 2378 Red). Click OK.
 -
Click Edit Notes

on the Design Panel.
-
In the Notes text box in the Notes dialog box enter 'Happy House Sampler', then click OK to save the notes.
-
In the Quick Access toolbar, click Save As

and the Save As dialog box appears.
-
In the Save As dialog, change the folder to Documents\mySewnet\My Designs if necessary. Enter the file name 'Happy House' and click Save.
-
In the Quick Access toolbar, click Export

. The Export dialog box appears.
-
In the Export dialog select .vp4 as the embroidery format and click OK. The Save As dialog box appears.
-
In the Save As dialog box, in the Save In box browse to the folder Documents\mySewnet\My Designs. In the File Name box, leave the name as 'Happy HouseExported', then click Export.
-
In the Quick Access toolbar, click Print

and the Print dialog box appears. Click OK to print a worksheet for the embroidery.
Alternatively, use the design you created in Add Designs to the Happy House Sampler.