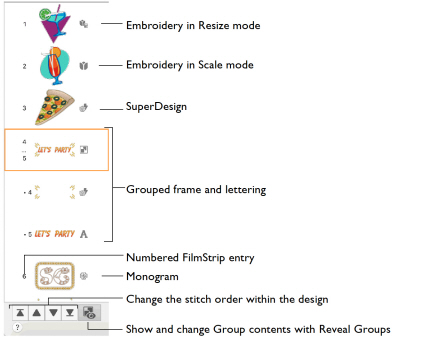
Use the FilmStrip to view and select the designs in the embroidery, and to change the stitch order for those designs.
A design selected in the FilmStrip becomes selected in the work area.
Note: The FilmStrip is not visible when the Modify tab is selected.
The design types shown in the FilmStrip are: Embroidery in Resize mode  ; Embroidery in Scale mode
  , SuperDesign
  , Lettering
  , Decorations
  , Ribbon
  , Monograms
  , Library designs
  &
&  , Digitized designs
  and Alignment Stitches
  . Designs within a Group are indented.
|
To learn how to |
Go to |
|---|---|
|
Resize or Scale an embroidery |
|
|
Create SuperDesigns |
|
|
Create Lettering |
|
|
Create Decorations and Ribbon |
|
|
Work with Library designs |
|
|
Create Frames |
|
|
Work with Groups |
|
|
Create monograms with the assistant |
|
|
Change the order of the designs |
Moving items within the FilmStrip
Move items within the FilmStrip with the Stitch order buttons (Stitch Later ![]() , Stitch Earlier
, Stitch Earlier ![]() , Stitch Last
, Stitch Last ![]() and Stitch First
and Stitch First ![]() ), or by dragging.
), or by dragging.
-
Use Reveal Groups
 to view the items within a Group on the FilmStrip, and to move items within and outside Groups.
 -
Use Command–click to select multiple designs, and Shift–click to select a sequence of designs.
-
Command–click on the top row of a Group will select all items within that Group.
Control Panel
Use the Control Panel to edit embroidery designs, repeat designs with Encore, add lettering, add SuperDesigns, add appliqué and decorations to the design, and add a frame or a border to the design.
To Open the Control Panel
-
Click the Control Panel button
 in the toolbar.
 -
Choose View > Show Control Panel (⌘/).
There are 9 windows in the Control Panel:
|
|
Design |
Change colors in embroideries, edit the notes and settings, rotate and resize, use Endless and Split Project. See Design Window. |
|
|
Create |
Use one of the assistants to create a design, insert a digitized design with mySewnet™ Digitizing, or open a cross stitch design with mySewnet™ Cross Stitcher. See Assistants. |
|
|
Encore |
Repeat embroideries. See Encore. |
|
|
Letter |
Add lettering using single or multicolor fonts and fonts of special characters. See Creating Lettering. |
|
|
SuperDesign |
Add SuperDesigns and adjust their size and appearance. See Creating SuperDesigns. |
|
|
Frame |
Surround a design or letters with one of over 500 decorative frames and flourishes, add a border or a motif underline. See Creating Frames, Borders and Underlines . |
|
|
Appliqué |
Create, view and adjust appliqué pieces. See Creating Appliqué Areas. |
|
|
Embellish |
Decorate your chosen background and embroidery with ribbon, beads, sequins, hotfix crystals or nailheads. See Creating Embellishments. |
|
|
Modify |
Edit stitches and blocks of stitches, and add color change, stop and trim commands. See Modifying Stitches and Blocks. |
Menu Bar
The mySewnet™ Embroidery menu bar is visible if mySewnet™ Embroidery is the active window. Each open embroidery or group of embroideries also has its own document window showing its name.
There are seven menus in addition to the Apple (![]() ) menu and the application menu: File, Edit, View, Design, Assistants, Window and Help.
) menu and the application menu: File, Edit, View, Design, Assistants, Window and Help.
-
To access the menu options, use the mouse to pull them down from the menu bar.
Insert Embroideries
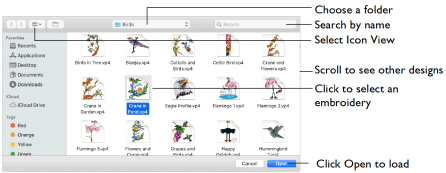
Use the Insert dialog to select embroidery designs to customize.
Note: Use Insert to customize an embroidery as part of a new project, and use Open to change the original embroidery. See Open.
To Insert an Embroidery
-
Choose File > Insert (or ⌘I).
Alternatively, click Actions
on the toolbar and choose Insert.
-
Browse to the desired folder in the Open dialog.
-
Switch to Icon View to see thumbnail pictures of the designs in the folder.
-
Scroll to view the other designs in the folder.
-
Click an embroidery to highlight it.
-
Click the Open button to load the embroidery.
The embroidery is placed in the current window.
Work Area
The work area is the area where embroideries are loaded. The work area includes the area surrounding the selected hoop. It is where you make changes to an embroidery. The stitch area is the available area inside the selected hoop.
Stitches are drawn in the appropriate colors. The embroideries are shown in either 3D or 2D. The background color and texture can be changed using mySewnet™ Configure. You can also load or create a background garment, fabric or quilt block.
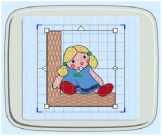
In Standard 3D view ![]() the real hoop is shown, with blue corners showing the stitch area within the hoop. The background is shown.
the real hoop is shown, with blue corners showing the stitch area within the hoop. The background is shown.

In Realistic 3D view ![]() the embroidery and background are shown without selection boxes, grid or hoop.
the embroidery and background are shown without selection boxes, grid or hoop.
In 2D view ![]() , the hoop size is shown by a blue outline with bold corners. Stitches are drawn in plain colors only, and stitches using multicolor threads are drawn using only the first color in the thread definition. The background does not use texture in 2D view.
, the hoop size is shown by a blue outline with bold corners. Stitches are drawn in plain colors only, and stitches using multicolor threads are drawn using only the first color in the thread definition. The background does not use texture in 2D view.
Background Grid
The work area has a grid. Zooming in or out makes the grid squares look bigger or smaller.
Select the Grid and its Size
-
To turn the Grid on or off, choose View > Grid (or ⌘.).
-
To change the size of the grid squares, choose mySewnet™ Embroidery > Preferences (or ⌘,) and set the size.
Hoop
By default, the hoop is shown at a size so that the hoop fills the window, as if you had clicked Zoom To Fit ![]() .
.
To Select a Hoop
-
Click Hoop
 in the toolbar, or choose Edit > Hoop to open the Hoop dialog. See Hoop Selection.
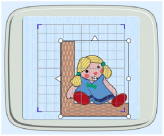
Note: If a selection box has round handles on its corners, part of it is outside the selected hoop. Move it into the hoop, or change the hoop size.
Design Information
The stitch count ![]() , dimensions (height
, dimensions (height  and width
  ) and number of colors
  for the selected embroidery are shown in the Information area of the Design window.
Color Select
The Color Select area of the Design Window shows the colors used in the selected embroidery. See Color Select.
Note: Color Select is blank if no embroidery is selected.
Zooming In or Out
You can enlarge (zoom in) or reduce (zoom out) your view of the work area.

Zoom To Fit shows the hoop so that it fills the window. This is the default size. Click the center marker on the zoom slider to see the embroidery at 100% or real size. See Zooming In or Out.
Using Text and Number Boxes
To view changes made in a text or number box, click in another text/number box, or press the Return key.