Creating Frames, Borders and Underlines
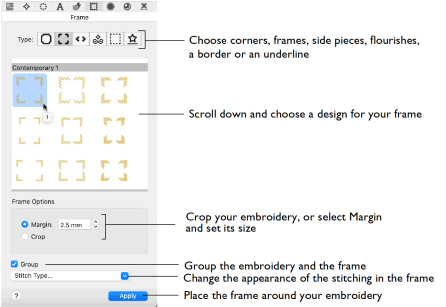
In the Frame window you can select corners, frames, side pieces, flourishes, borders and motif underlines to place around your embroidery.
Note: In this chapter, corners, flourishes, frames and side pieces are referred to collectively as frames.
Choose from the categories of corners, frames and side pieces. Then choose a frame set, and select a design. Place the frame around your embroidery, or anywhere on the work area.
Alternatively, select Flourish and choose a flourish to be placed above, below or as a duo above and below the selected embroideries.
Some frames are multicolored, and the stitch type for many can be changed. A frame can be resized with constant stitch density, and the stitch properties adjusted, until it is fixed as embroidery.
Note: If multiple embroideries are surrounded by a frame with the Crop option selected, the inner embroideries will be combined automatically.
The Frame and Flourish options stay the same until you change them, or close mySewnet™ Embroidery.
To Open the Frame Window
-
Click Control Panel
 , then click Frame
  .
.
|
To learn how to |
Go to |
|---|---|
|
Create a frame |
|
|
Create a flourish |
|
|
Change the shape of a frame |
|
|
Change the size of a frame |
|
|
Change the color of the frame |
|
|
Place a frame around an embroidery |
|
|
Use appliqué with frames |
|
|
Place a border around a design |
|
|
Create a motif underline |
|
|
Place a single motif |
Create a Frame
-
Load an embroidery in the work area and select it.
-
Open the Frame
 window.
 -
Select a frame Type (corners
 , frames
  or side pieces
  ).
). -
Scroll down to choose a frame set.
-
Click a frame to select it.
-
If desired, select Group to keep the frame with the embroidery.
-
Select to use a margin or to crop the embroidery when placing the frame.
-
If you selected Margin, set the Size in millimeters from -50 mm to 50 mm.
-
If desired, select a line or fill type, or appliqué, from the pop-up menu to open the properties dialog for the stitch type. See Choosing Stitch Properties.
-
Change the stitch or appliqué properties for the frame in the properties dialog, for example the density, and the stitch length, angle and pattern. Click OK to close the dialog.
-
Click Apply in the Frame window to view your framed embroidery.
The preview shows the first frame set of that type and its name.
Margin leaves a space between the embroidery and the frame around it. Crop leaves no margin visible, and will cut the embroidery to the shape of the frame.
Note: It is recommended to use the Group option when Crop is selected.
Note: When one or more embroideries are selected, the frame is placed around that selection.
Create a Flourish
-
Load an embroidery in the work area and select it.
-
Open the Frame
 window.
 -
Select Flourishes
 .
. -
Scroll down to choose a flourish set.
-
Click a flourish to select it.
-
Select whether to place the flourish Above
 , Below
  , or as a Duo
  above and below the embroidery.
 -
Set the Size of the Margin in millimeters from -50mm to 50mm.
-
Set the percentage width
 relative to the size of the embroidery.
 -
If desired, select Group to keep the flourish with the embroidery.
-
If desired, select a line or fill type, or appliqué, from the pop-up menu to open the properties dialog for the stitch type. See Choosing Stitch Properties.
-
Change the stitch or appliqué properties for the flourish in the properties dialog, for example the density, and the stitch length, angle and pattern. Click OK to close the dialog.
-
Click Apply to view the finished result.
The preview shows the first flourish set and its name.
Note: If a negative margin is used the flourish may overlap the embroidery.
Note: When one or more embroideries is selected, the flourish is placed above or below that selection.
Appliqué Frames and Foam Frames
For appliqué fonts, SuperDesigns and frames, the fabric can be changed as well as some of the border settings. For example, in Stitch Type select Appliqué Fabric, and in the Appliqué Selection dialog change the fabric, angle and margin. See Appliqué Selection. The appliqué placement stitches cannot be edited, but the position of the placement line may be adjusted to match the appliqué piece margin.
Note: The position of the pattern in an appliqué fabric may only be changed after fixing as stitches.
For Foam fonts and frames, only the color can be changed. The Stitch Type area is unavailable, and no properties can be selected in the Context menu.
Special instructions are displayed for stitching out appliqué or foam fonts, SuperDesigns and frames. The instructions can be previewed in the Design Player.
Stitching out an Appliqué Frame
Appliqué frames are designed to be stitched out in a particular sequence. They are created with the standard appliqué options, to trim on the machine. Preview the two stops in the Design Player, with instructions to place the fabric and to trim it. These instructions are also present on the printed worksheet.
Note: If you are using pre-cut pieces (with outlines created in Export Appliqué Pieces for a fabric cutter or INSPIRA® Cutwork Needles), the second stop can be ignored as there is no need to trim. It may also be useful to match the placement line to the appliqué piece margin, to ensure the placement line is visible.
When stitching out an appliqué embroidery, do as follows:
-
Begin embroidering. A running line will show where to position the appliqué fabric.
-
A stop then allows you to place the fabric. The message "Place the appliqué fabric now" is displayed.
-
Stitch down the appliqué fabric with double stitch.
-
The machine stops again, and the message "Cut around the appliqué" is displayed. Trim the fabric.
-
Finally, finish the edges with the satin or motif line.
Note: If desired, you can change the color to that for the first color of the embroidery.
Note: The placement section in the appliqué is the same color as the first color in the frame, so it doesn’t show under the appliqué fabric. If desired, change in mySewnet™ Embroidery to the first color for the embroidery.
Stitching out a Foam Frame
Foam frames are designed to be stitched out in a particular sequence. Preview the two stops in the Design Player, with instructions to place the foam and to remove any excess foam. These instructions are also present on the printed worksheet.
When stitching out a puffy foam frame, do as follows:
-
Begin embroidering. A running line will show where to position the puffy foam.
-
A stop then allows you to place the foam. The message "Place the puffy foam on the fabric now" is displayed.
-
Stitch down the foam with satin stitching.
-
The machine stops again, and the message "Remove any excess puffy foam" is displayed. Remove the excess foam.
The thread color is changed, and the framed design is stitched.