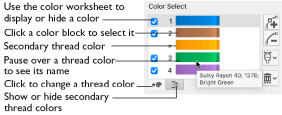
The color worksheet on the Control Panel shows the order in which the thread colors are used. The color worksheet can be used to change thread colors.
The group of objects using a particular thread color is called a color block. Use the color worksheet to hide and show the objects in any of the color blocks. Displaying objects that use a particular color is an easy way to show sections of a design.

Note: When you pause the arrow pointer over a thread color in the worksheet, the corresponding objects in the embroidery are highlighted. Also, a popup description of the thread color appears.
The first color in the design is at the top of the list, followed by the other thread color blocks. The numbers show the order in which the colors are used, and the samples show solid blocks of each thread color in 3D. The check boxes show which color blocks are hidden.
When a color is hidden, its check box in the Color Worksheet is not selected, as shown here:
|
|
|
|
Hidden |
Visible |
If there are many colors in the design, use the scroll bar to see the desired section of the list.
Note: If you have set a Draw Range, then only the objects in the color blocks that are visible within the range are displayed. Similarly, any objects hidden by object filters are hidden even if the color is visible.
Use the Color Worksheet
-
Open a design.
-
Click Control Panel
 , then click one of the color blocks in the color worksheet. The color selection dialog opens.
 -
Change a color, and then close the color selection box. The color in the design changes.
-
Deselect the checkbox next to one of the color blocks. The color can no longer be seen in the design.
-
Click Display All Objects
 to show all of the colors again.

