On the Modify window you can hide blocks of stitches according to their color. Displaying the stitches according to their color is an easy method of showing sections of an embroidery. The functions for viewing stitches by color are on the Modify window.
Hide stitches according to color, leaving the visible stitches available for other functions without affecting the hidden stitches. Selecting colors for display can be combined with the Draw Range to display a particular set of stitches that would be difficult to isolate with other functions.
Note: If you have set a Draw Range, then only the stitches in the color blocks that are visible within the range will be displayed. Also, hidden colors are not highlighted when the pointer is paused over them in the color worksheet.
Move and Merge Color Blocks
Use the arrows in the color worksheet to change the order of the color blocks, and to select color blocks to merge together selectively. For example, you can keep two adjacent identical color blocks in case you wish to vary them later. If you use ColorSort, all identical colors will be merged unless there are overlapping stitches.
Note: This may be useful if you want to merge two blocks of an identical thread color without affecting the color order of the rest of the embroidery. Alternatively, use the Move and Merge Color Blocks features if ColorSort does not merge colors owing to a few overlapping stitches that do not affect the design stitchout. You can also use Merge when optimizing designs with multiple areas of cutwork and stabilizing lines. ColorSort may occasionally merge stabilizing lines in these circumstances.
To select and change colors, see Color Select.
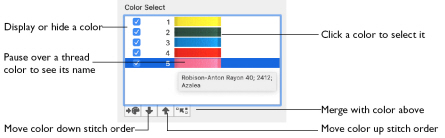
Move and Merge Colors in the Worksheet
-
Select a color block in the worksheet to highlight it.
-
Click the up arrow
 button below the worksheet to move the block up the stitching order.
 -
Click the down arrow
 button below the worksheet to move the block down the stitching order.
 -
Click the merge
 arrow button below the worksheet to combine the selected color block with the block above it, removing the Color Change command.
Note: Use Merge to delete color changes easily. Also use it to combine color blocks with the same thread color, after first moving one of the color blocks so that they are adjacent.
Effect of Draw Range on Color Blocks
If you deselect some of the check boxes in Color Select, and then change the Start or End stitch in the Draw Range, no stitches will be visible in the colors that you hid. To be seen, stitches must be visible in the Color Select and the Draw Range.