Use the Split Project to split very large projects, or use it to split smaller projects that are still too large to fit into your largest hoop.
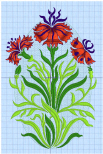
Split a Flower Embroidery
-
If required, choose File > New.
-
Click the Hoop button
 and set the hoop size to 360mm x 200mm - Universal Large Hoop 4, Natural Orientation.
 -
Choose File > Insert. See Insert.
-
Browse to the folder /Samples/Embroidery/Stitch.
-
Click to load the embroidery Three Flowers.vp4.
-
In the Design window
 of the Control Panel
  click Split Project
  .
.
The Split Embroidery page of the Split Project Assistant appears. -
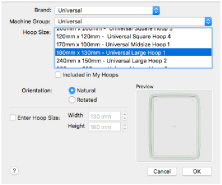
Click the Change Hoop button to select the hoop.
The Hoop Selection dialog opens. -
In the Brand pop-up menu select Universal.
-
In the Machine Group pop-up menu select Universal.
-
In the Hoop Size list, select 180 x 130mm - Universal Large Hoop 1, and in Orientation, select Natural.
-
Click OK to select the hoop.
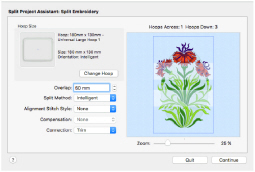
When splitting your project, try to adjust your settings to minimize cutting the embroidery. -
Check that the Intelligent Split Method is selected.
Note: Intelligent Split calculates a split line that cuts through the minimum number of stitches. -
For Alignment Stitch Style, select None.
Note: Depending on your machine, you may prefer to choose no Alignment stitches (many machines with this hoop type have special positioning features; for example HUSQVARNA VIKING® Designer Diamond Royale or PFAFF® creative sensation Pro). For other machines, use Corner alignment, as these are lightly stitched embroideries, and there are few splits within design elements. -
Check that Compensation is set to None as this is a relatively small project and the overlap will be set to avoid splitting heavily embroidered areas.
-
Check that Connection is set to Trim as the split lines will not cross large stitch areas.
-
Ensure that Overlap is set at the default of 50mm.
-
Use the Next
 and Previous
  buttons to step through the sections and check the split lines for the whole design.
 -
The split line has cut through the tip of one of the petals of the flower on the left. Click Go Back to change the overlap.
-
Set the Overlap to 55mm, then click Continue. The split line no longer cuts the flower.
-
Click Export All Sections to save the project as numbered sections. The Export dialog appears. See Export.
-
In File Format, ensure that .vp4 is selected, then click Continue.
-
In the Saving as dialog, browse to the folder mySewnet/My Designs.
-
Click New Folder, and name the new folder Three Flowers. Then browse to the new folder.
-
In the Save as box, enter the name ’Three Flowers’, then click Save.
-
Click Continue. The Print Options page appears.
Note: If you have not saved the files a warning message will be displayed.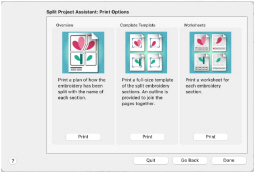
-
In the Overview area, click Print.
-
In the Print dialog click Print to start printing. An overview of how the embroidery was split is printed.
Note: The Overview shows how the embroidery was split, how each split section was named, and the number of stitches involved. Use this to decide the best order for stitching out the split sections. -
In the Complete Template area click Print, and then Print. (If necessary, change printing to a single side.) A full-size template of the split embroidery sections is printed, with an outline around each section to indicate how to join them together.
-
In the Print dialog, click Show Details, then set Design Scale to 50%, and click Print to print the worksheets.
-
Click Done to close the Split Project Assistant.
Note: This is a size that will show the whole project, not the actual hoop size which will be selected before stitching out.
Note: It is not necessary to choose the hoop orientation, as this will be set automatically to create the least number of hoopings. However, the split lines may be more pleasing in one orientation, so it is worth checking the results with both orientations.
For a large embroidery that is to be split into several sections, use the largest single-part hoop available for your machine.

Note: You can adjust the Overlap to avoid splitting an area. Increasing or decreasing overlap may make it easier for Intelligent Split to fit all of an embroidery into one section, or to cut the embroidery in an inconspicuous place.
Note: The preferred file format for saving embroideries is .vp4, as this will preserve the separate parts of multipart designs. It also preserves thread color information and notes.
Note: The files are saved as the files Three Flowers_01 to Three Flowers_03. Creating a new folder makes it easier to find all the sections.
Cut out the template and attach the sections as a guide for positioning fabric within the hoop.
Note: The worksheets give the dimensions of the section, the number of stitches, information on the thread colors used and the Notes and Settings for the embroidery.