Use the Save Embroidery page to preview the split sections, and to export the split embroidery sections automatically.
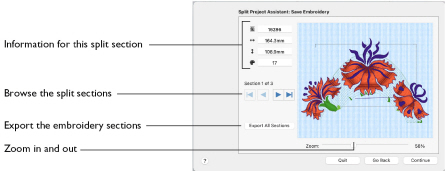
Information
The information area on the left shows the stitch count

, dimensions (height

and width

) and number of color changes

in the current section.
Section
To the left of the preview, view the number of the split section, and the total number of sections.
-
Click the navigation buttons to browse through the split sections:
-

and Next

to step through the split sections one at a time.
-

to jump to the first split section.
-

to jump to the last split section.
Export All Sections
Use Export All Sections to export all the split embroidery project sections shown in the Save Embroidery preview as .vp4 files, or in an alternative embroidery format. The Split Project displays the Export dialog so you can select the embroidery format, then the Save or Save As dialog so you can name your design. For more information on using Export, see Export.
-
Click the Export All Sections button use the Export dialog to export all the split embroidery project sections.
Export in any of the following embroidery file formats: Brother/Baby Lock/Bernina PEC (.pec), Brother/Baby Lock/Bernina PES (.pes version 2 - 11), Compucon/Singer PSW (.xxx), Husqvarna Viking / Pfaff (.vp4, .vp3 and .vip), Husqvarna (.hus, .shv), Janome (.jef and .sew), Melco (.exp), Pfaff (.pcs), Tajima (.dst) and Toyota (.10*).
Note: The preferred file format for saving embroideries is .vp4, as this will preserve the separate parts of multipart designs. It also preserves thread color information and notes.
File Name: When you save a split embroidery, you provide a single name which is used for all parts of the split embroidery.
Suffixes for Multi-Hoop Splits: For a multi-hoop split, the split parts are distinguished by a two digit suffix that is automatically added to the file name. The numbers start at 01 for the top left hoop, then increase across and down, for example Three Flowers_01 to Three Flowers_03.
Note: The numbers are used only to distinguish the individual sections. You can stitch out the sections in any order, as required.
Zoom
Use the Zoom bar to change the view of the embroidery. Zoom in (drag the slider to the right) to magnify the view. Zoom out (drag the slider to the left) to shrink the view.
When zoomed in, use the scroll bars or swipe to move around.
Go Back
Return to the Split Embroidery page.
Continue
Go to the Print Options page.