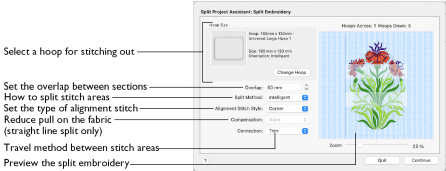
Use the Split Embroidery page to select the desired hoop size, the splitting method, the overlap between hoop areas, what type of alignment stitch to use, the level of compensation, and the type of connection for your project.
Experiment with the embroidery splitting options. This will give you the best possible split.
Note: Multipart hoops are not available for Split Project. Use the largest single-part hoop for your embroidery machine.
-
Click Change Hoop and select a hoop for stitching out. Then select your other split settings, and click Continue.
Hoop Size
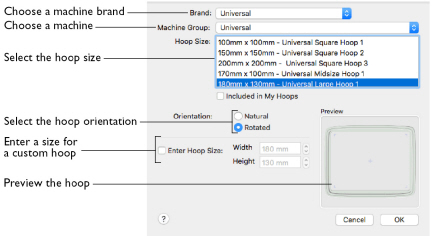
View the selected hoop, and its size and orientation. Set the hoop size according to the size of your project, or the hoop you wish to use for stitching out.
Note: The largest single-part hoop size for your machine is usually the best choice. This reduces the number of split sections, which reduces the number of split lines, hoopings, and color changes. The minimum recommended size is 100 x 100mm.
Change Hoop
Use Change Hoop to select a hoop for splitting the embroidery project in the Hoop Selection dialog. See Hoop Selection.
-
Click Change Hoop and select a hoop, then click OK.
Overlap
Set the desired overlap between each hoop area. A large overlap is usually best, to provide maximum flexibility for adjusting the split lines. However, increasing the overlap may add unnecessary extra hoop sections, so check the previews carefully.
Hoops may not overlap more than 50%, so that adjacent horizontal and adjacent vertical split lines cannot cross each other. The minimum overlap is 9mm, and the maximum overlap is half the shortest side of the chosen hoop.
-
Click the arrows to set the Overlap, or enter a value in the number box.
Split Method
To split automatically, use Intelligent or Straight Line split. Where possible, use Intelligent split, as it avoids cutting through solid sections of embroidery.
Intelligent: Intelligent split automatically calculates a split line that cuts the minimum number of stitches, and minimizes cuts through solid sections of embroidery. For example, a large embroidery will be split at a narrow section, and an embroidery that fits in one stitch area of the hoop will be left in one piece.
Straight Line: Straight Line split cuts through any individual embroidery that does not fit entirely into one stitch area of the hoop. Embroideries are cut straight across the center line of the overlap zone.
Note: Lettering may be split straight along the split line, cutting through characters rather than using gaps and spaces. In such cases, it is recommended to use Intelligent split instead. For complex designs, use Split Project in mySewnet™ Stitch Editor.
-
Choose a Split Method from the pop-up menu.
Alignment Stitch Style
Alignment stitches are used to help with lining up the split sections of the embroidery. Choose from None, Corner and Baste.
-
Choose an Alignment Stitch Style from the pop-up menu.
None: No alignment stitches are added to the split sections. Select None when using a hoop template to align the split sections, or a fabric that you do not want marked by alignment stitches. None is also appropriate if you can split the embroidery project without cutting through any design elements.
Note: Some machines have special positioning features which do not require alignment stitches.
Corner: Trims are added at the beginning, and small L-shaped corners of three long loose stitches are added at the end of each split section. The alignment stitches go to the corners, halfway across the overlap between the hoop areas.
Use the trims at the beginning to align to previously stitched sections. The alignment points for subsequent sections are the corners of each L.
Use Corner for lightly stitched embroideries, and where there are only a few splits within design elements.
Baste: Trims are added at the beginning, and a box of long single stitches is added at the end of each split section. The alignment stitches go to the corners, half way across the overlap between the hoop areas.
Use the trims at the beginning to align to previously stitched sections. The alignment points for subsequent sections are the corners of the box of basting stitches.
Use Baste for heavily stitched embroideries that may be difficult to line up owing to pull on the fabric.
Compensation
Compensation adds overlapping stitches along the edges where the embroidery is split. This compensates for pull on the fabric. Choose None, Low or High. Compensation is initially set to None.
Note: Compensation is only available with Straight Line split.
-
Choose a Compensation level from the pop-up menu.
None: Use None if you can split the embroidery without cutting through any of the design elements.
Low: Use Low when cutting through a lightly stitched embroidery, or when the split lines go through only a few stitch areas.
High: Use High when the embroidery is dense, when the split lines make long splits through stitch areas, or when stitching onto materials such as knitted or stretchy fabric.
Connection
Set how to connect separate areas of the same color along the edges of the split sections. The initial setting is Trim.
-
Choose a Connection method from the pop-up menu.
Trim: Use movement stitches to travel along the edges of the split sections. This option is suitable when an embroidery project can be split without cutting through large stitch areas.
Running Stitch: Use Running Stitch when the split lines cross large stitch areas.
Continue
Go to the Save Embroidery page.